Menu
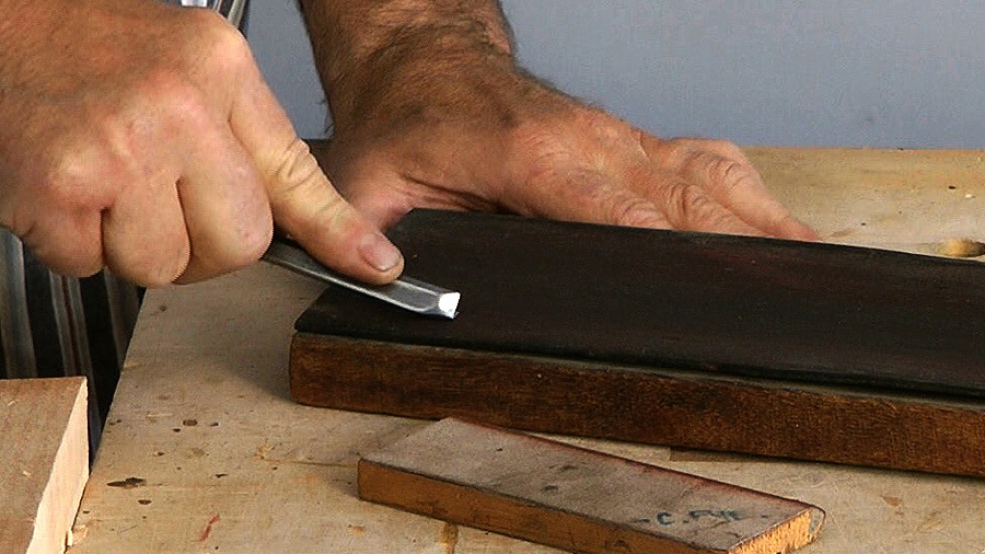
Step 7: Stropping

| 09 August 2023 22:20
Simon - well done!
If your V tool is performing well, it might be best to leave it as is.
However, do bear in mind that rounding the keel a little does help it go round corners without a tendency to 'jig' in a straight line.
If you do take the keel to the stone, since you are already sharp, be very light and stop at the cutting edge.

| 05 August 2023 16:17
Hi Chris ,
So my chisels are sharp. I watch you carving deep and effortlessly and was getting frustrated so watched the V tool sharpening series. My Ashley Ilses V tool has a huge heal on it which is really wide. I bought a Tormek today and completely re ground it. The difference is AMAZING before a 2mm deep cut was hard, now a lovely 4mm deep cut is like butter.
Thank you so much for this particular video!, I have just realised that I missed the part where you sharpened the heel on the flat stone too. Now I’m wondering if I should still do that as it is cutting so well? I also reground my 3/4 number 4 and oh man, levelling with it is sooo much better ????
| 18 July 2023 17:53
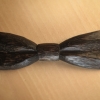
Clovis - Just a thought: it would actually be better to use a tilted V might be better for feathers?
By tilting you can force the apex under the edge of the feather, thus giving you a bit of an undercut.
At the same time, you round over the feather below (the one that is effectively the background to the undercut one, which will leave the feather surface more fuller - you can use the side of the V as a chisel to merge. The danger with the macaroni is that you leave the surface flat.
Experiment on spare wood with both tools before you commit to too much work?
Also, you can use the V in a similar way for the central spline of the feathers - but I'd still recommend using gouges to add splits - see our feather carving video.
And lastly - let's see your American Eagle in the gallery!
| 17 July 2023 21:11
Thanks Chris! I'll give it a shot. I'm carving an American Eagle and the macaroni is used to delineate feathers. If I can't get the tool sharp enough, I may use a v-tool layed over on its side to give me the effect I am looking for. Your videos have been very helpful and enjoyable to watch. I have watched some of your sharpening videos twice and I must say my tools are sharper and cut better than they ever have. I really enjoy the sound they make slicing through the wood. Thanks again.
| 17 July 2023 20:52
Clovis - The macaroni would appear to have been invented for speeding up shallow furniture ornamentation - I confess I've never needed one.
But...
If I had to sharpen a macaroni, I'd tackle it along the guidelines of sharpening the V tool and suggest, as your paradigm, you use our step-by-step guide to sharpening the V here on WWtv.
When I sharpen the V, I treat it as 2 chisels joined together; the macaroni is similar but is 3 chisels joined together.
The real difference is that the macaroni chisels sit at 90 deg. rather than, say, the 60 deg. of most V tools.
You'll need to parlay everything across from V tool to the macaroni, only working an increased number of bevels, edges, keels etc.
As with the V tool, sharpen the 2 keels of the macaroni like gouges: slightly rounded, definitely not sharp.
Hope this makes sense, and best of luck!
| 15 July 2023 22:40
Chris- I have a macaroni tool I need to sharpen. Would you please share some ideas on how to sharpen it?
Thanks!
| 04 March 2021 18:38
Great thanks chris I have some pva already I just wasn’t sure if it would work on the leather
So last thing I did yesterday was strop the v tool this morning I noticed a small chip in the same place on the other side so it’s back to the grinder for another try
Frustrating as it was cutting beautifully from the bench stone oh well more experience ha ha!
| 04 March 2021 17:40
Thomas - It might be a duff V tool - and you are gaining a lot of experience and confidence! Good for you for keeping going.
You can stick leather to wood with PVA (wood) glue. Light pressure/clamp to keep flat.
| 03 March 2021 16:24
So a whole day today commissioning/sharpening everything aches! And my fingers are sore lol!
Thought I had my v tool sorted I was very happy as I go to strip it I notice a minuscule chip in one edge just above the bottom of the v I stripped it any way and for the first time since I had it (been a while) it’s usable so I’ll live with it for now
I read down some of the other comments and seen that pfiel have a problem with v tools mine is a pfiel so I wonder if that’s the problem and not me after about five attempts at it
Anyway I’ve been using my strop loose on my bench I’ve now sorted out a board to mount it too and wondering what sort of glue is best to stick it on with?
| 19 May 2019 11:24
I thought I'd post an update on my experiences with Pfeil V tools versus Ashley Iles since my original post. As per Chris' comments the difference is substantial. The Pfeil I had to regrind frequently due to chipping at the radius. Meanwhile, the Ashley Iles I've shaped just once and it's only needed stropping since - and that's despite frequent pounding with a mallet! Not once has it chipped even though I have it set to a shallow angle. After my 25mm Auriou #3 it's my favourite gouge currently - which is not something I expected to say about a V tool!
| 29 April 2019 07:37
Jof - To my mind the Pfeil tool has real problems and you can choose pretty much any of the other manufacturers for a better one: Ashley Iles ,Auriou, Taylor or Stubai for example.
| 28 April 2019 18:46
Having now spent a day with my V tools - a small Ashley Iles and a 10mm Pfeil - I've noticed something especially infuriating about the Pfeil; it seems to chip at the transitions between the straight sides and the rounded gouge region (resulting in a tiny protruding bit at the radius)... Feels like I'm reshaping the tool more often than actually using it! I noticed your comment below about the radii on Pfeil tools and at least I feel a bit less inept now :) Is there a particular brand that makes a more reliable/robust V tools? I'd guess Ashley Iles from my experience with the small one, but I use that for fine detail so I'm not so sure it's the best example.
| 28 April 2019 08:21
Jof - You can, and I used to do that to strengthen the low outer bevel for using the tool upside down, which I never do. However, because the V tool is used with running cuts and treated more gently shall we say than gouges, it seemed more time adding an inside bevel than it was worth, so I gradually fazed it out and the tool seems to work fine.
When you clean up the burr on the inside of your V tool, you can certainly add inside bevel, or do that if you want to add strength to the edge.
I'd add that having a good shaped keel makes a huge difference to how the V tool performs. In the picture about you can see the keel is drawn back from the bevel into the heel. Thus there is less metal following though the cut. There's a video on 'conical keels' that will tell you more.
| 27 April 2019 16:45
Hi Chris. I finally got around to commissioning my V tool and wow what a difference! Thanks for the detailed videos. Question, though; apologies if I missed it in the videos but why don't you apply an inner bevel to this particular tool? Given the shallow angle, I would imagine that without the inner bevel the tools would be a bit more fragile?
| 25 January 2019 15:45
Paul - It's unusual for the problem to be with the steel: today the metallurgy and tempering is well understood and controlled by computers - but you never know.
Look end-on to your V tool at the thickness of metal between the inside channel and the outside at the keel: There should be a certain thickness here, which gives rise to the heel. Some toolmakers, and I'd name Pfeil as one of them in particular, make the metal very thin at this point, where the tool has been folded as it was made. That might be you problem? (Thin metal here can cause the V tool walls to squeeze together when hit into hard wood and break off a chisel.) I'm afraid the answer is to try another make.
The other think I could suggest is adding a little inside bevel to the V tool. Delicate work but the result will be a much stronger edge.
| 22 January 2019 23:38
Thank-you for the great videos. I have followed the instructions to the letter (20 degree angle) and every time I get a perfect looking edge and then the right edge of the parting tool near the apex folds like tin foil. Can I safely assume that this is the result of problems with the steel in the tool? Thanks The edge looks perfect before it folds and the thickness of the tool looks consistent on both sides and the keel when I set the edge of the tool. It's the only thing I can think of.
| 02 August 2016 11:50
Alejandro - I think you should get stuck into your carving and see what you need down the road!
| 27 July 2016 16:39
Excellent!
What do you think of the idea of having a hard wood set and a soft wood set?
Of course, this will farther down the line for me.
| 27 July 2016 16:23
Alejandro - The knuckle thing is a guide only. The fact is, you'll often be carving convex or concave surfaces, so it won't apply.
You should find the knuckle test gives you an easy carving position in the low angle grip and the bevel can be as low as 15-20 degrees. Having said that, of course this long low bevel is quite weak, hence one of the reasons for the inside bevel: it sort of buttresses from the inside and gives a bigger overall bevel 'wedge' to the cutting end. At the same time the wedge is quite short and thus have less work.
I worki in a limited range of woods, none of which are very hard. But, if I were carving a very hard wood, I'd strengthen the cutting edge more by seriously increasing the amount of inside bevel. I do know of carvers whose inside bevel is a third as long as the outside and there's nothing to sop you having the cutting edge almost in the centre of the blade.
So sharpen your gouge, try it in the hard woods and see what happens. Grind in more inside bevel, re-sharpen and try again. You'll soon find what works best for these woods.
| 25 July 2016 21:23
I just read your advice to Steve Langley and...
I bought my first carving tool, the Pfeil #12 10mm, and I am getting ready to commission it. Should I also go for a 30 degree angle? I was planning on following whatever angle my knuckles create, as per your recommended hold...
That said, I do plan on working on harder woods, e.g. Goncalo Alves, given my Uruguayan heritage (which heads to another question for another time).
Thanks again!
| 20 April 2016 13:45
Sorry for my delayed reply Chris. And thank you for your response. I left the Auriou at my friends studio. I should be able to get that back next week and i will send it to you. I will have a go at resharpening at 30 deg as you suggest and see how I go.
| 06 April 2016 17:02
Steve - Wow, that all sounds incredibly frustrating. Without actually seeing either the two Auriou, the Stubai or the Pfeil V tools, it's hard to say what might be going on. Send the second Auriou to me at the address you'll find on the Contact Page and I'll look at it and the fault you've found and pass it on. There is such a thing as a 'bad batch' and Auriou, Classic Hand Tools would want to know - so always return faulty tools even if its wearing. I'll vet a replacement for you.
It would be an odd coincidence if the other 2 makes had similar problems but sometimes the thickness of metal right at the root inside of the V apex in Pfeil V tools is often quite mean, so there's not a lot of keel. You sharpen the chisels sides at 20 degs. and the thin apex is vulnerable to breaking. So that might be the issue here.
Now the Stubai: these are usually well, if sometimes a little roughly, made. And they seem to be tempered a lot harder than many other makes, which quality I actually like. However, harness means more brittle; you don't want to lever the edge while it's in the wood, especially in hard wood, or you may break bits off. It might look the same problem as the Auriou but there may be an issue of how you are using the tool.
So... my advice here is to go back to the Stubai and re-sharpen. Make the angle of the chisels more like 30 degs. When you carve go straight in, along and out. Make sure you don't lower the handle suddenly and prise at the wood.
You can also think about adding a small but significantly inside bevel to the V - that will toughen the edge up a lot. Lastly, and this is a last resort, you can sharpen the part of the V tool that is chipped. In practice, as long as it cuts cleanly, you probably won't even notice.
One more thing: I know this sort of thing saps the will to live but, don't give up! Persistence is a great quality for a carver to cultivate and there will be more frustrating things waiting as you get into carving... And there are plenty of other things you can carve, without a V tool!

| 06 April 2016 09:25
Chris, I sharpened some gouges yesterday, including a V tool, it finally looks beautiful now (after all these years) and cuts very well, it's nice and it feels good! I'm going faster now with more and more insurance.
Thanks a lot Chris ... and Carrie obviously!
| 04 April 2016 13:51
Chris, Thanks for a great demonstration on the V tool sharpening process. I wonder if you might be able to help me with a long term problem i am having sharpening this tool. I started off with a Stubai 60 deg 10mm chisel. It was fine in lime wood abut when i tried it in oak the edge broke. I spent days sharpening it on my stones and each time i came to carve oak the edge seemed to break away. I decided to buy the Auriou V chisel from Classic Handtools. After commissioning the new tool i did a test cut and the cutting edge at the apex chipped. I did the whole process again and the same happened. On closer inspection i found the tool had casting faults in the bottom of the valley. I sent it back and they replaced it with a new Auriou. I went through the same process and the same thing happened. It must have been a dodgy batch as it was the same fault. After all this sharpening and getting nowhere i lost the love for carving. A friend who is a carving and has a Tormek tried to sharpen both the Auriou and the Stubia had the same results. He gifted me a new Pfiel V tool 6 months ago but i put all the carving away. A month ago i decided to carve the Edwardian frame you have demonstrated. I got the frame made up, commissioned the chisel and tested it on a spare bit of the oak frame. Unbelievable the cutting edge of the apex chipped straight away. I measured the angle i had ground it to and it was about 17 deg so i started again and made sure it was 20 deg. Feeling confident i brought it back to the oak and guess what. It chipped again. Please, please help. I am getting much quicker at sharpening but it's the carving i would like to be doing. Thanks, Steve
| 28 May 2015 11:51
Mark - How much damage one does to th cutting edge depends on how you use the tool, the quality of the bevels and the hardness of the wood. The 'damage' happens in the main at a microscopic level, leading to what we call 'blunt'. However, if you strop regularly you shouldn't need to go back to the stones for anything other than making sure the bevel remains flat and the correct cutting angle is maintained. It's better to strop too much and BEFORE the tool begins to dull than after. Let me preemp your next question! What is 'stropping regularly'? Try what I've called the '20:20 rule': 20 minutes carving then 20 strokes on the strop - and see how you get on...
| 24 May 2015 02:38
Chris, after sharpening with stones how long can you just strop before you have to go back to the stones
Thanks, Mark P

| 09 November 2014 14:29
Chris, great series of videos, thanks very much. I seem to be getting my tool quite sharp, but I'm finding the edge dulls or chips extremely quickly, even in soft pine (carving S-scrolls). I think I have a good tool (a new Stubai v-tool). Do you have any idea what I'm doing wrong?

| 20 July 2014 22:15
Very clear and concise tutorial, and very quickly allows review before starting a new tool. I would have found a prolonged view of the finished tool from the side and bottom very helpful at the good last. Thanks.

| 24 June 2013 05:59
Hi Chris, I am new to carving and based in Malaysia so help is hard to find. A great video on sharpening the V tool, it has shown me lots of things that iI have been trying to find out for a couple of weeks. I look forward to vatching many more. Thanks.
| 12 June 2013 03:24
If that last shot of Chris stroking the wood with a perfectly sharpened V-tool isn' PURE JOY, I don't know what is. Makes a carver tear up... grin. (Well, I must be a good student, considering I made just about every mistake Chris pointed out. So now I know what not to do.)
| 22 March 2013 06:06
David - Good question! Straight should do it. We try to cover all the bevels (and thus edges) so, if in doubt about covering all the keel/apex, a little rock to either side would be fine.
| 21 March 2013 13:27
Hi Chis , Thanks a lot for these videos I am now slowly fixing my errors.Just 1 question. At the end of the stropping video do you roll the V tool while stropping the apex,as with gouges, or hold it straight? Thanks again for all these excellent videos.
| 03 January 2013 07:05
Randen - Yes, the leather needs impregnating with fine abrasive. (Look under Sharpening > Stropping by Hand for making strop paste.). And, yes again: shape a piece of wood/MDF/ply to suit the shape, allowing for a covering of very thin leather; and rub some strop paste into the working part. Very low tech!

| 02 January 2013 14:01
Hey Chris, Thanks for your videos. They are very helpful. Gives guys like me who are just getting started a start on the right foot. It looks there is something on the leather when you strop. Is it oil or some other kind of abrasive substance? Also the slip strop looks like it is just MDF cut to the preferred angle with leather on the edge. Is that so?
| 09 October 2011 08:44
'Commissioning' a carving tool so the tool is now working at its best: checking the cutting angle, (with a gouge) adding an inside bevel, checking the cutting edge and so on is usually a one-time event. Regular - and correct - stropping will maintain the edge and that's all you need to do. Strop often and BEFORE the edge becomes dull. However, with time you'll find the shape will 'drift' a little, in which case may need to touch it up by offering the keel or and bevels to the finer stones. You certainly shouldn't need to go back to the full grinding monty unless the edge gets damaged - dropped or dinged against another piece of metal. So, look after it!
| 05 October 2011 16:20
Hi, Once the tool, whether that be a V-tool or gouge is sharpened, am I correct by saying that it only requires stropping to maintain this cutting edge?...or do you have to resharpen the tools again at some point?
| 23 September 2011 16:03
Chris: Great tutorial ! Simple and crystal clear. If my V tools are not razor sharp now, no one but myself to blame. This is a great model for future lessons: video, audio, presentation, content, all excellent ! Russ, Cincinnati, OH - USA
| 19 September 2011 15:26
Great stuff Chris,
As one who in my earlier years of carving actually had the misfortune of breaking out a wing on a V tool through improper sharpening these step by step tuttorials will be invaluable.
I especially like the emphasis you place on locking your arms and wrists and use body motion to maintain the bevel angle.
Keith Cheveralls
USA

| 17 September 2011 01:22
I agree Douglas. Very helpful. I like the concept of breaking it down to two chisels and a gouge in the middle. Really demystifies the sharpening process.
Thanks Chris.
Dennis

| 16 September 2011 09:30
Thanks Chris,for making vee tool sharpening less challenging and mysterious. Like many carvers I've been a bit nervous but your step by step teaching is interesting and helpful.
Douglas