Menu
Many carvers find it difficult and frustrating to sharpen their V tool correctly. No longer! Here is a logical, step by step method that will nail the V tool for you once and for all.
To get the most out of this series, please read the following notes:
Lastly, For a complete look at sharpening your woodcarving gouges, see my book: Woodcarving, Tools, Materials & Equipment, Vol.1.

| 12 March 2023 10:48
Beth - You're very welcome!

| 11 March 2023 18:37
Chris, this step by step guide helped me so much. I had a v tool that recently got a jagged edge. This was a tool that you had set correctly for me in a class a number of years ago. I wanted to restore it to the angles that you had set. The process was much easier thanks to this guide. I couldn’t have done it correctly without it. I learned so much! Thanks!
| 30 March 2021 07:37
John - You'll see V tools that are uneven occasionally, even new ones, and this really goes to show what a tricky tool it is to make. I love bringing old tools back into service so, myself, I'd certainly have a go.
Keep to your cutting angles as you sharpen and let the length of the bevels be what they will be. You will probably have to go for a little melding around the keel. At best you'll have a great V tool with a history and, if nothing else, you'll learn a lot about sharpening.
Let us know how you get on!
| 29 March 2021 17:53
Chris,
I acquired a "new" old V tool as part of a set of used gouges on Ebay. It looks to be a good tool but I noted one wing of the V is approximately 1/32 inch thicker than the other. What is acceptable in this regard? Could I simply shape a longer bevel on the thicker side? I guess I asking if it will be worth the effort to refurbish the tool (it also needs a new handle). I have several other V tools though this one is larger than my others.
Thanks in advance for any advice.
Have a great day.
Chip McKenna
| 25 November 2020 08:49
Hi Chris
Thanks for the advice, the note about the thin metal was particularly useful. I had imagined having to hit the electric grinder heavily and spend a long time on it to remove the digit. Well in reality, a much lighter touch soon got the edge back mostly with bench stone and slip stone. i am now happily back to the carving and have given the nail a naughty smack with a lump hammer, I don't think it will do it again!!.
| 22 November 2020 18:06
Richard - Ouch! You couldn't do that deliberately if you tried...
If you look closely at your Flexcuts, you'll see that the actual gouge part is straight - this is made from your normal high carbon steel, even if given a temper on the harder side. The bit behind it that bends - that's the ('flex') spring steel.
These two parts of the blade are tempered differently; you can't have a tool well-enough tempered for carving that's springy or bends in any way -
and it's really the innovation that it's claimed to be...
Anyway, you really have no problem; you should just go ahead, grind back beyond the damage and re-commission.
One point: Flexcuts are much thinner than most conventional tools (thin is always good in a carving tool) and so the length of the bevels will appear much shorter. But just sharpen to normal cutting angles.
| 21 November 2020 15:08
hi Chris
I have a few flex cut palm tools which are made from spring steel, great for final detailing. Last week I dropped the V tool on the floor and as luck would have it hit a nail which holds the wooden floor down what are the chances?. I have seen on the internet many comments saying that spring steel tools are hard to sharpen etc.. this has a fairly severe divit out of it and will need radical work do you have any tips/experience of such tools?. cheers Richard
| 11 November 2020 17:28
Adam - I've had several Taylor V tools over the years - in fact my very first V was one of theirs - and never had a problem, so not sure what to say. It might be an aberration or their standards might have decreased. That's a problem with buying tools on the web; obviously far better to pick up a carving tool and inspect and handle it.
Although a little conical shape in the keel is easily fixed, if you think there is too much, send it back. I've had V tools from Auriou and Ashley Iles that have been well-shaped; you could try them.
As to the hair-shaving-rule-of-thumb: it's nonsense! We are carving wood with scooping cuts, not running a barber's shop, and a cutting edge that shaves hair might not last seconds when offered to timber. So don't go there. The cutting edge is a product of the bevels. Understand what the profile of a gouge should look like, and by whatever means, get there - the cutting edge should look after itself and be properly supported by the 'wedge' of metal behind it.
Having said that, you do need to leave a clean cut if you intend finishing your work from the tool without sanding. If you are leaving snail tracks etc then the edge is damaged, often microscopically, and you will need to touch it up on the fine stone and strop.
Lastly, 'no matter how I grind and strop' - is telling me you are not appreciating the stages in commissioning a carving tool. There is initial 'shaping' - extremely important, setting the bevels etc but stopping short of a final sharp edge. Then 'sharpening' proper: coming to that final edge. Grinding is right down one end of the spectrum; stropping up the other. If you are having problems getting your tools sharp, take just one and go back to the beginning. Think about those bevels, the 'wedge' of metal you are forming.
Get hold of the downloads on this website, watch the lessons and really try and grasp what you are aiming for there - the path. Then maintain the quality, (be exact, say, about keeping the outer bevel flat and at the correct angle) as you proceed step by step.
Every carver started with learning to sharpen their tools - including me. It's a discrete skill that can be learned; whereas carving is very creative and uses a whole new set of manual skills.
Keep going!
| 11 November 2020 15:14
Chris. My first V tool that I sent a picture in (with a conical back) was a Pfeil. I purcahsed a Henry Taylor the other day and although it looked ok in the online picture, ultimately I think it's similarly conical. Could you please enlighten me as to where these V tools without this wretched conical back can be found as I can't afford to keep on buying them unseen only to be disappointed.
Also, do you have a rule of thumb that offers immediate evidence when a chisel is sharp enough? There's a chap on YT who reckons it ought to be able to remove the hairs on your forearm but no matter how long I grind and strop, I never feel that come close to this point. Thanks.

| 15 July 2019 00:38
Hi Chris. Wanted to give an update on my day. I was finally able to "commission" my v-tool to the best of my abilities. I am certain a few months from today, as I get more experience with carving, I will not like the way it cuts. Today I went back to step 1 again and redid the process. I did not proceed until I was satisfied with the step, and only then I moved to next. In the process I took some beautiful pictures of the stages as I completed them. I wish there was a way to share these with you. I, them practiced running cuts, which I feel are ok.
My v tool was not "bricked" like yours. It was working well I think. I am glad I went through the process. It served a number of goals. First off it has given me some degree of confidence that it is intact possible to "commission" a tool if one is patient and meticulous. At first it may take a number of attempts, but with each attempt I felt I was getter better. secondly, it gave me an in-depth understanding of the tool itself. how it comes together, how the keel and chisels work etc. And finally, after this process I had increased confidence in the carving process itself. The way I now hold the tool, give cuts just seems different, there is more flow to it.
I want to thank you for being such an inspiration to all of us. I hope we continue to talk over the months and years as I progress with my new obsessions with wood carving. You are not only a master carver, but a master teacher as well. Thank you
| 14 July 2019 15:41
hi Chris. thanks for the note. This v tool is an Auriou, so probably the problem lies in me. I have redone a few times, and everything else looks good to me now, except the nagging "V" at the apex. I might be taking too much metal off during the process of shaping the "keel". I am back in my workshop this beautiful Sunday and will give it another go or a few more. Thanks
| 14 July 2019 08:53
Imran - Sharpening can feel a bit frustrating to begin with. I can't add to the step by step method I'm giving you here so you need to go back and complete each stage exactly before moving on. Do appreciate that you are investing time in learning a skill, which means you may need to repeat many times before you are really familiar with what you need to do.
Being more specific, and from what you describe, some thoughts:
1. The only way to create a secondary bevel is by lifting the handle to a second and higher angle. You need to be consistent in the angle at which you present the chisel to the stone. If, in the middle of the stroke, you stop and move the blade sideways a little, you'll see new scratches at right angles to to the existing ones. This will tell you how the bevel is contacting the stone. You could also try blackening the bevel first with a Sharpie.
2. You are only removing metal - yes? So if the corner of the chisel is missing, you have rubbed it away. You need to keep a close eye on the white line of the edge and make sure it attenuates evenly, adjusting the presentation to the stone accordingly.
3. By the same token, a V grove inside the apex is usually caused by excess rubbing with the edge of the slipstone.
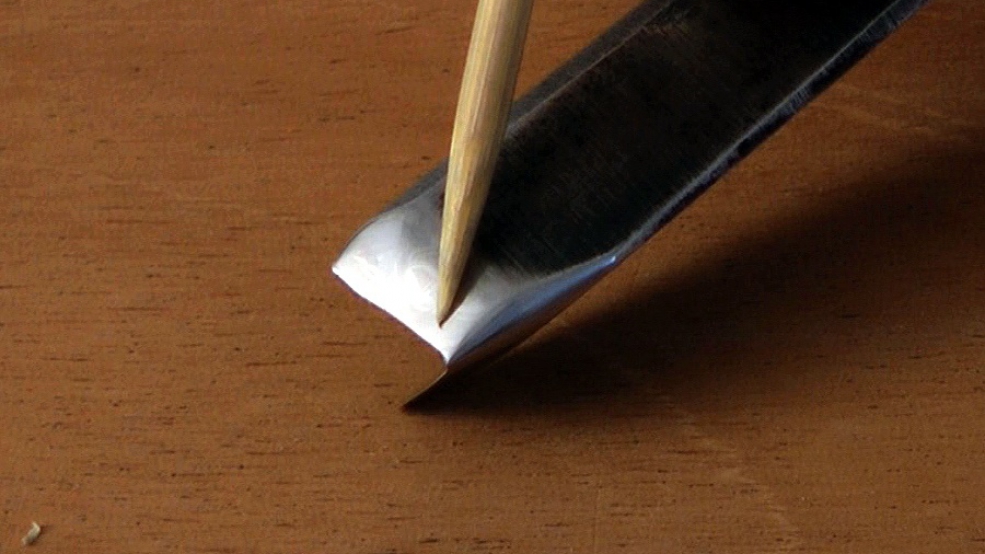
However: it is quite possible you have a faulty tool. Look down the cannel, inside the V from the end, and look for a small groove running up the blade just to one side of the apex. If it's there - and it's due to bad forging - it means you always will have thinner metal at this point and you'll always have a notch at the apex. It doesn't happen often but I have seen it several times - and there is nothing for it but to discard the tool. (Send it back!)
Hope this helps!
| 13 July 2019 21:53
sorry that should read " apex" in my previous post. thanks
| 13 July 2019 21:52
hi Chris my apologies for the multiple posts. I have attempted to sharpen my v tool twice. both times I end up with a "v" looking groove at the keel. what am I doing wrong? thanks
| 13 July 2019 17:51
hi. also on this particular chisel of my v tool the length of that chisel (from the corner to the apex of the v) has foreshortened. I have lost the corner and when I look at it from the side, the top of the chisel going towards the edge has an angle to it.
| 13 July 2019 17:11
I probably should have picked a gouge to learn to commission my tool. I went with a v tool as my 1st practice tool to commission. I am using bench stones and somehow managed to create a 2nd bevel at the periphery of one of the chisels on the v. Can you please talk me through how to fix this problem. thanks
| 19 March 2019 09:58
Lucas - I did! But then I gave it the equivalent of CPR and brought it back to life...
| 12 March 2019 22:16
You murdered that v-tool!!
| 18 December 2016 06:41
That hurt me too
| 02 November 2015 20:20
Thanks Chris. I'm working through the tools I have and the improvement is well worth the effort. I have been going to the fine stone too early.
| 02 November 2015 18:38
Mike - About 20-30mins for the full commissioning? Don't worry about speed. make sure you get each stage right before moving on and with the coarser stones, go as near to losing that white line as you dare. You only need to do this once, then stropping will keep the tool, and you, happy for a long while.
| 02 November 2015 11:26
Hi Chris, roughly how long did it take to sharpen the V-tool. I suspect I'm going to the fine stone too soon and a as a result it's taking much longer than necessary. Mike

| 05 March 2013 18:44
Chris. This V tool video was extra helpful for several reasons: (1) you did a voice over after the video was shot; (2) On my iMac, one can maneuver around back and forth very cleanly; this is really helpful when looking at features you might show in the video; (3) You also commented on the special features of the bent V tool (but even more would have been welcome) . Thanks! Bill.
| 05 November 2012 14:56
HI Chris,
I did not really mind.. it was just a post to let you know.
Oscar
| 05 November 2012 13:08
Oscar - Sorry, you will find odd glitches like that in these lessons, especially in our earlier offerings. Sometimes we notice a little fault only after we've gone way beyond where we can repeat the filming. We're woodcarvers at the end of the day and do our best!
| 05 November 2012 06:10
Chris, interesting that half way through the audio went from right to keft, had to switch my ear buds,
Chisel and a brick.... Aarrrgh, that hurts :-).
Oscar
| 21 November 2011 09:14
Ed - Thanks for the suggestion. We'll make and post a fuller lesson on this as soon as we can.

| 20 November 2011 17:55
Chris,
During the Introduction at about 7:15 min...You mention the "Conical Shape"....and recommend flattening the cone. Would really appreciate your showing specifically "How" to do such flattening. Such process gets to be very touchy...to not damage anything etc. as your book describes quite well. Just a brief "showing" of the best means to get that metal removed...at ea. edge of the conical shape. Thanks!