Menu
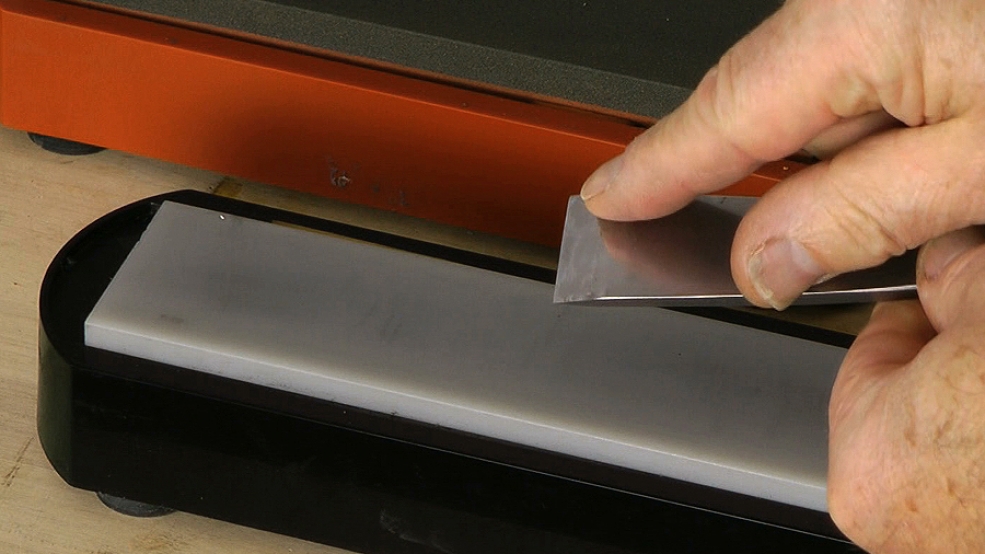
Woodcarving chisels, which differ from bench chisels in several important respects, are some of the simplest carving tools, but they still need sharpening properly!
And here's how. You can read a lot more about sharpening chisels and skews in my book: Woodcarving Tools, Materials & Equipment vol.1.

| 12 June 2024 12:27
Thank you Chris. I just checked and Lee Valley has a carborundum grit they call lapping grit to use for a very inexpensive price.

| 12 June 2024 06:43
Tim - The DMT lapping plate will eventually wear out; we are just talking a layer of diamond grit cintred to plate below. They work because diamond is harder than whatever you'll be rubbing on it. So, yes, you can use it.
Some thoughts:
I really don't know what the impact of an oilstone versus a waterstone but I would guess there's not much in it, with the oilstone a bit more 'damaging'.
With the waterstone, you remove dull material to reveal fresh and sharp crystals, and that happens quite quickly.
The oilstone crystals haven't changed, just the surface shape, and it takes a while to remove material, relative to the waterstone.
Not sure I'm helping here! I'd probably keep it for the waterstones. You can use a piece of glass or old saw blade with carborundum paste/oil for the oilstone.
| 11 June 2024 21:51
Hi Chris. I have a DMT lapping plate that I use to flatten my water stones. Can I also use the same plate for oil stones or would I be better using something else? Thanks!
| 06 October 2023 20:55
That makes lot of sense. Thanks for your insights, they're very helpful.
| 05 October 2023 09:08
Darrin - I definitely don't round the corners of any of my lettering tools, whether the chisels or the gouges. I prefer them sharp and square - true for all my carving tools. And other than the chisels, I don't have tools just for lettering, I use the same gouges everywhere.
But that's my style and how I work. Martin Wenham cuts his letters in a differently to myself. I see him fundamentally as a letterer who carves; whereas I'm a carver who letters.
Feel free to experiment, especially if you are only interested in lettercarving.
The bottom line, though, is always going to be the final carving, especially it's design, to which we add the execution.
| 03 October 2023 19:42
The standard practice is to sharpen chisels so that the edge is dead straight with crisp, square (90 degree) corners. As Cosman explains it, feathering refers to very slightly rounding just the extreme corners (maybe less than 1mm) leaving the cutting edge straight, not convex.
(This is a much less extreme version of what Martin Wenham does with his lettering chisels, which have very obvious convex cutting edges.)
In terms of lettering, I wonder if you see any downside to slightly rounded (vs. 90 degree) corners.
For grounding to nearly flat surfaces and sculpture, rounded corners as described above seem less likely to dig in and cause unwanted lines. Here, it seems a slightly convex edge might be even better. Maintaining one set of chisels would be my ideal, so unless there's no real problem to rounding the corners, I'll likely leave them square. Thanks!
| 03 October 2023 07:40
Darrin - I'm still not sure what you mean by 'edges of lettering chisels slightly relieved/feathered', but bottom line, try it with just one tool and make a comparison. You might have discovered something!
| 28 September 2023 16:06
Thanks for your insights, Chris. Rereading my lettering question, I see that it was vague. What I meant to ask if having the edges of lettering chisels slightly relieved/feathered would be a detriment to achieving crisp letters. But if there's no real advantage to this slight rounding of the chisels edges in terms of grounding, I likely won't do it.
And Tom Perkins' work is beautiful. I'd love to be able to do what he does even half as well. I'd better get to my shop and start practicing!
| 28 September 2023 08:24
Darrin - If I understand you right, this is standard practice in sharpening bench planes: the cutting edge of the plane blade is slightly convex, so the shaving is a little deeper in the middle than towards the corners and, yes, it help eliminate lines when you overlap the strokes of the plane.
I don't think this is necessary for the flat carving tools used for grounding; we come at the wood and grain in all sorts of directions, rather than a series of straight lines along the grain, as you do with a plane.
However, feel free to try it, see if it makes a difference and let us know!
Lettering: Yes, a lot would be lost if the letter edges weren't crisp, sharp and flowing!
Along with the line at the root of the trench, it's all you have to create the beauty.
Lettering is a hard skill to master well but as it contains techniques that are used in everyday carving, it'll pay dividends to your skills as a whole if you work at it.
Have a look at stone letterer, Tom Perkins. (Put 'Tom Perkins stone lettering' into Google, then images.) He's an absolute master. Look at the edge and tool lines that define the light and shadow of the incised letters...
BTW stone letting is a totally different technique to wood and created with only a simple chisel. So Tom is essentially a fine calligrapher making his drawings permanent.
| 27 September 2023 16:43
Hi Chris. I just watched a Bob Cosman video on getting the smoothest finishes using hand planes, wherein he recommends "feathering" the edges of the plane iron to avoid plane lines. This is done on the final sharpening stone by putting more pressure first on one side of the iron, then the other for about 30 seconds each. The result is not so much a camber, as a very slight easing back of the very edges. It made me wonder if this might be useful with carving chisels. I thought it might be useful for grounding when you want the smoothest finishes possible without sanding.
Regarding lettering, would anything be lost by not having crisp edges? Thanks!
| 08 May 2023 08:59
Darrin - Whilst I like the look of Martin Wenham's work very much, it's important to understand that Martin is a letterer and not a woodcarver. When you look at his carved letters close up, you can readily see the numerous small facets, the result of his many individual cuts as the narrower gouges work their way around the sides. You don't see these facets when you look at the letters from a distance.
I like Martin's style very much but, close up, this facetting bothers me as a carver. To me, it's an expedient. He's found a way of fixing his lovely letterforms in the wood but he's not using his carving tools efficiently.
The way I teach and was taught how to carve letters is by slicing around; and working with the sweep and corners of the gouge. Over many years I've never improved on the method. When done well - and it takes far more practice than Martin's method - it's clean, facetless, quick and uses fewer tools.
And here's the thing: my 'lettering' technique is the same as I use for, say, setting in a relief carving; it's not actually something special (that needs rounded corners, for example). It's just the way of the carver.
Anyway, you should make your own mind up by trying Martin's way of working as well as mine. But do bear in mind that it's the end result, the lettering forms and overall composition that matters; the techniques are just a means to the end.
| 03 May 2023 18:00
Hi Chris. Thanks for the further clarification. One additional question: in addition to your book on lettering, I've been reading Martin Wenham's. He recommends removing the corners from lettering chisels, giving them a slight camber. This is presumably to prevent the corners from digging in when making chasing cuts along the trench walls, and when paring the inside curves of counters. I suppose it might also help to prevent scalloping when marrying stab cuts along trenches. He also recommends starting with smaller chisels as it gives more practice with making various cuts, and prevents larger errors. I know you suggest keeping corners, and also matching the chisel width to the size of the letter, making single cuts to establish trenches when possible. As a beginner, its a bit confusing to hear such seemingly contradictory advice. I think its just a matter of different artists approaching their arts differently, but I'd love to hear your thoughts. Thanks again for providing such a wonderful resource!
| 03 May 2023 16:39
Darrin - Yes, that's it. You'll have parallel bevels until they arrive at the heel. The heel itself will be what it will be: With a tool of even blade thickness, the heel will end up parallel to the edge. If not, it doesn't matter much as you have good bevels from which to work.
Onwards into the carving!
| 30 April 2023 20:58
Hi Chris. I appreciate your taking the time to provide a very detailed answer. If I understand you, I think you’re saying that as long as I hold the tool at a consistent angle as I sharpen the chisel (whether on a sander or stone), I needn’t worry about how the heel comes out. If the metal is indeed thicker on one side than the other, the heel will necessarily be uneven, ie, not parallel to the cutting edge. But even with this unevenness, I can still get a straight cutting edge that carves well. It’s really the straightness of the cutting edge that matters. I was assuming a straight edge equated to a straight/parallel bevel.
| 30 April 2023 15:50
Darrin - Without seeing your tools, your stones and yourself in action, it's a little difficult to know what exactly is going on, but I've got a few thoughts/comments for you.
1. Remember the two sharpening 'guides': the white line of light, the embryonic cutting edge, which you thin evenly and will eventually disappear; and the bevel scratches, which show you how you are presenting the metal to the abrasive. Keep these in mind all the time as you work. You do seem to be on top of that.
2. If you consistently present the tool at the correct cutting angles - checking the 'guides' all the time - the edge will look after itself - after all it's only the end result of working on the bevels.
Even if the blade is of uneven metal, you should still be able to get a square cutting edge at the right angle. But what may well happen is the HEEL (where bevel meets blade) becomes wavy, or tilted etc because of the change in metal thickness giving you different lengths of bevel. I think this must be what you are seeing.
Here's my advice: Just ignore the heel! When you are carving, you won't even notice the heel shape.
3. Ideally the blade will have even metal thickness across. But bottom line, there's quite an element of hand forging in these tools and some variation in the heel line is quite common, rarely enough for a tool to be returned and rarely anything to worry about.
What matters is after you have sharpened them with the correct cutting angle etc etc, you can carve well with them.
The tools are only a means to an end. So sharpen them to the best of your ability and see how they serve you in practice.
Hope this helps!
| 28 April 2023 00:49
Hello. Thanks for all the very helpful lessons posted here. I've been sharpening my gouges on diamond stones. Learning to properly sharpen has taken a good while to master, but I can finally say I'm seeing the results you've outlined in your books and other sharpening lessons. I can't say the same for my #1 chisels, however. I just can't seem to get straight bevels. No matter how much I try to keep the tool at the correct angle as I draw it across the stone, I end up with uneven bevels. I'm starting to wonder if it's down to the tools being unevenly forded (ie, not of standard thickness across the blade). I've tried new Henry Taylors (bought in 2023), which I returned because they just looked uneven to the naked eye. There seemed to be quality control issues that I didn't want to deal with as a beginner just learning to sharpen. I then bought 3 new Ahsely Isles (London Pattern) #1 chisels, thinking their QC would be better. Out of the box, they had nice, straight bevels (but were only rough ground, not honed). Since they were ground to almost 25 degrees, I wanted to bring them down to your recommended 15-20 degrees. Using my belt sander, and carefully holding the tool square at the proper angle, I quickly got an uneven bevel (the right side of the bevel being longer than the left). On the opposite side of the tool, I got the exact opposite result (the left side of the bevel longer than the right). It seems that this would happen if the tool wasn't of uniform thickness. Is this even a problem I should worry about? And if so, what should I do about it? Thanks!
| 20 January 2020 17:06
Chris - I don't recommend the diamond stone in part because I've yet to find the equivalent 'cut' to the Arkansas, but also the lack of slipstones in the diamond world. At the end of the day, however, I really don't care what people use to sharpen their carving tools! If you can create what I am calling the 'correct' profile of the bevels along with a keen cutting edge using a house brick, then no argument from me. Let's get on with the carving!
So, see how it goes. If what you have and do works, then no need to get anything else. Look at the No Fear Sharpening download for a crib sheet of what you are looking for.
| 19 January 2020 12:29
Hi Chris - New member enjoying your advice and the videos. I have been making walking sticks for more years than I care to remember, but I have only just moved into detail carved heads more recently. Forgive me if I have not delved far enough into your videos but I have yet to find reference to Diamond stones. Instead you seem to favour the Arkansas finishing stone.
I have an Ultex double sided 1000 / 300 that I use. Should this be appropriate or should I start saving up again.
Regards Chris Burton
| 22 April 2016 14:58
Shane - The #1 on the Sheffield list is a double-bevelled chisel. I use these for principally for letter carving and sometimes when I need a straight edge within a carving. (Sharpened as below.) If I want to cut a woodworking joint such as a mortise or tenon, or and truly flat face, then the single-bevel carpentry chisel is the tool of choice. If I want to flatten the background of, say, a relief carving, then I go for the flattest gouge, the #3. What you end up with are very light scoops of facets. You can't use a dead flat #1 because you'll just keep digging the corners in.
| 20 April 2016 21:13
Chris, I'm sorry if maybe i used the wrong verbiage. I was thinking of the #1 of the sheffield list. Do you use these or do you only normally use the 3 as your flat tool? I was wondering because I have a #1 and was wondering how to sharpen it.
| 20 April 2016 19:57
Shane - I never trust factory specs! At the end of the day only you will know what edge you want, not a non-carver on their hundredth tool of the day.
You are looking to the chisel's compound angle: the size of the overall wedge of the 'chisel' metal. If you sharpen each side at a low cutting angle of about 15 degrees, you'll get an overall 30 degrees.
Single bevel chisels: I never use them except for general woodworking and then they are sharpened as a regular carpenter's bench chisel (look online) - and that's very different from the carver's chisel, which is effectively used bevel down.
| 20 April 2016 02:28
Hi Chris,
How do you figure out the cutting angle on a double bevel? Or just keep it with factory specs? For a single bevel chisel, same question.
| 12 February 2016 19:17
Chris, it works now, sorry for the inconvenience! It's a great pleasure to follow your videos. I have learned from a master in my country (France),there is 18 years ago, who was self-taught, it's good to see the way of another master, who learned from a master who learned from a master... a lot of skills!
| 12 February 2016 14:54
François - I can't reproduce your issue with the sound. Anyone else? Perhaps emptying your cache and refreshing might fix it.
| 12 February 2016 10:47
Hello Chris, thank you for your 'work'! I have seen or rather heard since 1.55 until the end, there is a ticitic sound instead of your voice.