Menu
Our relationship to mice is ambivalent to say the least! Cute, a la Beatrix Potter in someone else's house; pests when we find them chewing through our own... But children love them fairly unconditionally and I can say from experience that this little doorstop mouse has charmed a few.
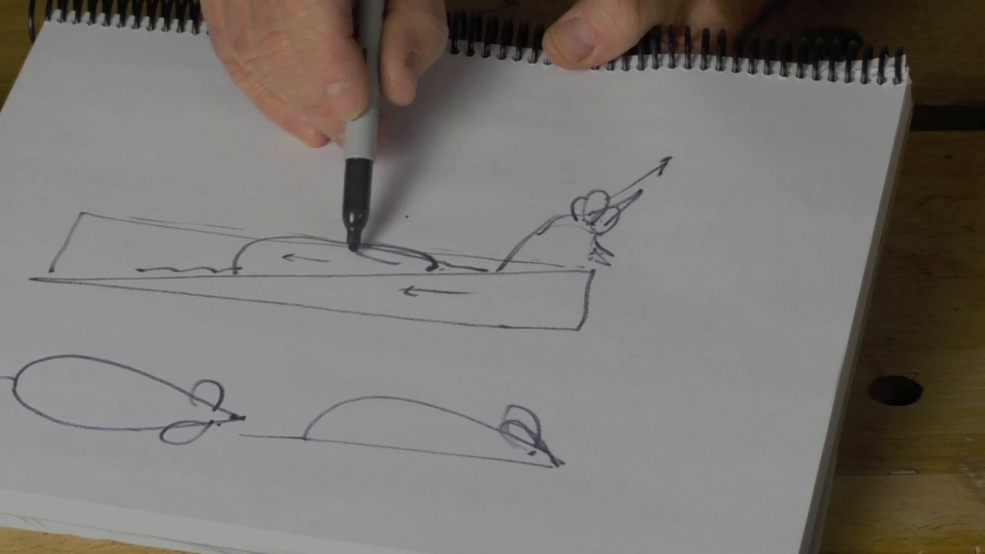
This project doesn't have to be a doorstop! You can sit the little mouse on (in?) a bowl, on a walking stick, a book shelf-lots of possibilities. What I hope to show you - and what I hope I show you in every project on the Woodcarving Workshops.tv website - is the method: the process, from block of wood to finished mouse.
In this lesson I begin with the idea and how I was 'nudged' from my original concept, through using a model to take a working drawing and into the block of wood.
Note on the model: You see me using a model here (and in several projects on WW.tv) and I hope you can see how useful it is. It's not about copying but all about being clear in your mind what you are aiming at and working out issues beforehand. It needn't be gallery standard! There are workshops on modelling here. Do have a go.
Members can download my working drawing and tool list below.

| 04 November 2019 19:07
Imran - the #9 gouge is the semicircular one (or should be!) and you use that for general removing wood. The #10 and #11 gouges are increasingly U-shaped: the semicircular gouge with extended walls; used for making grooves and trenches more that anything else and useful, especially the #10, because of the combination of shapes.
A problem is that this U-shape can vary. You my have parallel sides to the U, which is most common and the style I prefer, or have the sides widening towards the corners. Pfeil, as you say, miss out the #10 and go straight to their own version of a #11. This #11 isn't an extended #10, more a fingernail, and widens to the corners. I've never used this make or type of 11 but I think it will do the job. I suggest you buy just the one, perhaps the 3/8in 10mm. and see how you get on with it?

| 03 November 2019 20:33
Chris, apology n my previous note. I should have said Semicircular vs U shaped gouge. The sweep 10 that you refer to then, would that be a semicircular gouge or a u shaped (Pfeil sweep 11)? thanks
| 03 November 2019 20:05
Hi Chris. I am gathering tools for this project. Regarding sweep 10 that you have in the tool list. Is this the semicircular gouge or the veineer? Pfeil goes from 9 (semicircular gouge) to 11 (veneer). For this particular project would you suggest a semicircular gouge or a veneer. Appreciate your time. Thank you
| 03 November 2019 18:08
Imran - Without a bandsaw, I would draw the profile on either side of the squared-off starting block, making sure they register exactly. Then cross cut though the waste with a saw at short intervals. Then chop the waste away up to the lines to give your starting profile. You can see me do this to the Pelican project, first video.
A coping saw can do a lot but it struggles with thicker profiles. This is a good, old-fashioned way that was no doubt used before bandsaws existed.
| 02 November 2019 19:09
hi. hope all is well with you. in this project you describe the use of a bandsaw for the initial cut/shape. Is there another way to get this done for folks who don’t own a bandsaw yet. thnks
| 28 April 2019 08:22
Jof - If you go to Videos > Tools & Equipment, you'll see videos that explain the fundamental difference between 'true' (#3 - 9) and U'shaped'(#10 - 11) gouges.
Ask more if they don't help!

| 24 April 2019 12:52
Hi again. I notice from the pdf you use a series of similarly-sized #9 and #10 gauges here as well as in a few other projects. I have a vague recollection you explain this somewhere but I've forgotten; when would a #10 be used versus an identically-sized #9? Thanks.
| 29 April 2015 14:00
Don - That's a fair point and I can see that, apart from saving wood, different colours would look great. Let's see your mouse in the gallery!
| 17 April 2015 14:57
Ann - The working drawing does not include any extra holding wood and the wee creature itself is 75mm (3in) high as it sits on the fat end of the wedge. Another way of holding might be a carver's screw into the thick part of the wedge or to 'paper sandwich' the wedge to some other waste wood. Good luck!

| 17 April 2015 14:06
Chris, now I'll try to formulate a real question/suggestion as I take my time looking for the right piece of wood: I may be wrong, but I believe your drawing reflects a starting block (without extra holding wood) of 105mm in height... on your scale, the mouse itself seems to be 75mm without including the wedge. Could you confirm?
| 17 March 2015 19:16
My wife thinks the mouse is cute, so I have to get carving
JOE
| 17 March 2015 12:58
Ok - so I don't want to do real work today: when you say your starting block is 75 x 45 x 170mm, is that with the extra bottom piece for holding?
| 17 March 2015 12:55
Of course I had to start watching (instead of doing my own work!) - what a great lesson on planning!
| 17 March 2015 12:20
Happy St. Patty's Day - to my delighted surprise, a few days early, I found this wonderful new project that I was looking forward to. I also want to thank you for the detailed various perspectives in the working drawing!