Menu
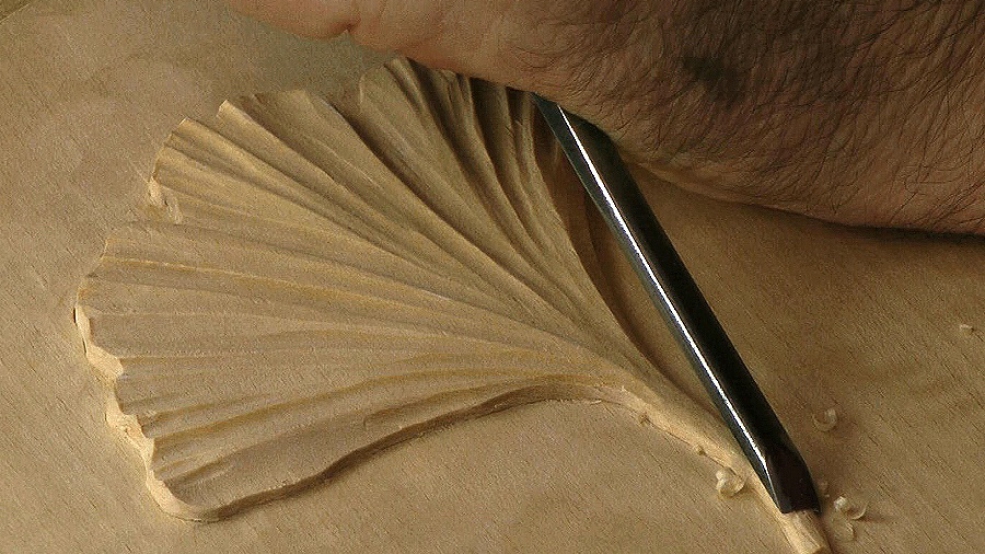
The Ginkgo leaf: practice in running channels or 'flutes'.
Also: saving yourself time by not setting in before you have to ...

| 15 March 2018 07:45
Lee - I assume by A.I. you don't mean Artificial Intelligence!
Ashley Iles uses the standard Sheffield List so their #5 is exactly that. The #3 in this system is the flattest gouge, with #9 being a semicircle. The #5 lies below halfway between to two ends of the range.
I would add that Ashley Iles tools tend to be rather thick so don't be surprised if you seem to end up with a very long outside bevel when you commission them to the correct cutting angle.

| 12 March 2018 23:38
Hi Chris.
What is the A.I. equivalent of a flat gouge #5 x 5/8 ? You use it when setting in the slow curves. I was under the impression that a #5 was curved and not flat? Sorry I’m very new to this and want to make sure I’m buying the correct tools. Many thanks
| 21 March 2017 18:43
Karen - I didn't let the oil dry fully; you can wax onto oil quite soon after you put it on. (Though not the other way round; once wax is dry, the oil won't penetrate the wood well.)
Using oil and wax as you suggest, to give different densities of tone is pretty much the only thing I do in the way of 'colouring' carvings. (A wash of milk paint, as in the Gloves and Book, or coffee staining as in the Baguettes is quite unusual really.) So, yes: but always do a little experiment o waste wood first before committing the whole carving.

| 21 March 2017 16:14
Chris, did you wait till the oil dried before you began waxing? Could you, say, in a different carving vary the mixture of oil and turpentine to create different densities of tone? Say in a face to separate it more from the garment. ie: say a cloak on top of a dress.
| 18 April 2016 08:01
Shane - You can see me cut the grooves in the video and in order not to tear up the ridges I sometimes go back and forth on opposite sides. The trouble with deeper grooves is that the ridges, particularly when cut across the grain (which means very short fibres) is weak and will readily break off. So my rule is never to make flutes deeper than I need to. The grooves I cut look sharp and well defined because my tool is sharp and I cut cleanly (back and forth for the deeper grooves) and because we have a good side light that give good shadows - and that's what you want for any relief carving.
To make grooves deeper without tearing up the wood, you have the right idea: you'll need to use narrower tools, still working in the same way.
| 17 April 2016 13:52
Hi Chris,
Im very new to carving, so It would have been nice to see how you created the deep flute ridges. Did you make a pass with say a #8 10mm, then go through the same groove with a #8 8mm? I'm wondering how you got the high defined ridges without the sides of the gouge cutting in?
| 29 September 2013 07:24
Oscar - You are quite right and that's a very good point: one should always seal the back of the wood as well as the front, for the reasons you say. I usually seal the backs with a matt acrylic varnish.Shellac is an alternative. I never oil or wax the backs of a relief carving because these finishes can come off onto the wall(paper) when the relief is hung. I didn't seal the backs of these little reliefs because they were so small and were just an exercise but, really, it's a good principle to follow and I 'should' have. Thanks for the question!
| 25 September 2013 03:59
Chris, shouldn't the back also be finished with oil or wax so as to seal it from moisture and prevent the wood from warping or cracking?
Thanks,
Oscar