Menu
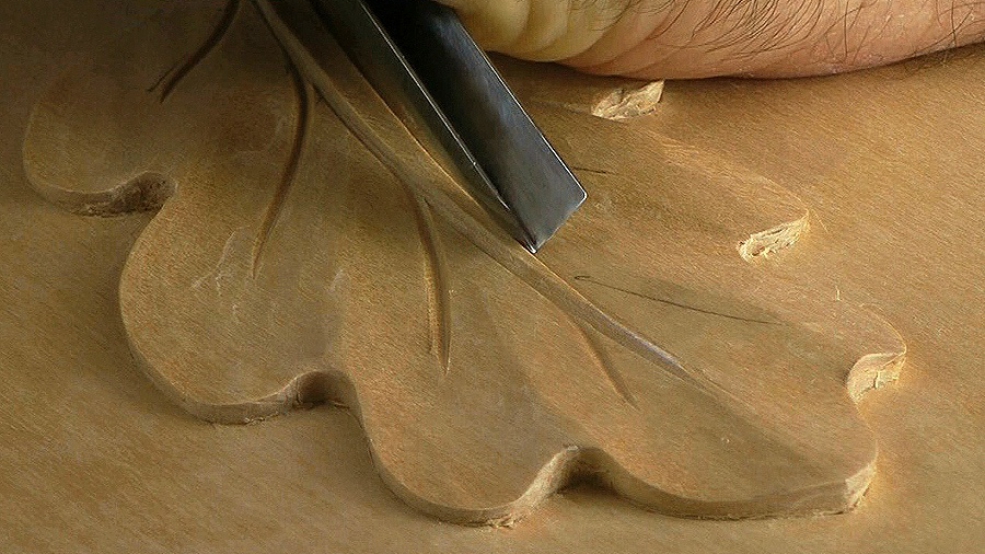
An Oak leaf, European Oak: more 3-dimensional and introducing undercutting ...

| 25 March 2020 16:32
Thanks, Chris. I understand that I need a practice piece for my practice piece -- I can do that!

| 23 March 2020 10:15
Hi Rebecca - One of the best qualities a carver can have is persistence - and you have it! Next, perhaps, is an enquiring mind: what's happening, why; how could I do this better, and so on. I think we can tick that box too. So well done. Just keep going.
Let's see if I can help you here: My finished surfaces may look flat but they aren't; they are facetted. In other words you can see the cut from the tool. With my flat (#3) gouge the facets are very light and how visible they are depends on the lighting - it might be the lighting in the video that make you think they aren't there. This list faceting is generally how I finish surfaces.
Now, assuming your tools are properly sharp, low cutting angle, keen edge etc and your wood is good - will take the carving - then we have to look at your technique.
I'd suggest you get a spare piece of wood and just focus on this aspect: smoothing different shaped surfaces
Two things to look at/practise:
1. The slicing cut (the edge moving sideways as the blade moves forward, rather than simply being pushed in a straight line)
2. Using the tool upside down, so the sweep, the curve of the blade is in sympathy with the form underneath.On this last point: if the shape is flat or hollow, then you use yo ur gouge with the convex, outside bevel down on the wood - If the shape is rounded, flip the gouge over so the concave inside bevel is against it. The more the tool matches, the less noticeable the facets must be. Yes? This is important in leaves that have undulating surfaces.
Hope this helps. Be encouraged! This is bedrock for your carving; you'll be using these techniques again and again as you grow as a carver.
| 23 March 2020 02:00
Hi Chris, Thanks for the wonderful videos. I'm new to carving and have spent the first six months of my limited shop time just learning how to sharpen the tools! I kept the frustration level under control by reminding myself of your remarks that if I ended up wearing away half of a tool it would be money well spent on learning. And I never did get all the way down to half the tool. So, now I'm on to the actual carving and got through the first two leaves cheerfully enough. Modeling this oak leaf has been very frustrating for me, though. I am getting better at the setting in, even in the tight spots, but the surface shaping is just plain awful. When I watch you do it, it looks like you're using a gently curved gouge, yet you get a smooth surface on the leaves. Using a quite flat gouge, I get a very textured surface that doesn't look good at all. Yet a flat gouge doesn't give me the effect, either. I know that's very vague, but with all your experience maybe you know what I'm talking about. I think I'll post a photo of the leaf in progress as my profile picture so you can see how awful it looks. I'm not giving up, but I'm not having fun with this one, either! By the way, one problem I had is that I examine the video so carefully and was thrown by the fact that you decide to carve the space between the lobes very low to the background to simplify the setting in of the tight bits, but in many close shots, the tight spots are actually higher than the lobes. I decided one side must have raised lobes and the other side lowered lobes. Yes? Again, the videos are great and so ... soothing.
| 05 March 2019 07:45
Charles - There isn't really a 'correct' here, either will do, giving a similar finish.
I think tung oil dries a bit shinier and harder when put on neat and both tend to darken and enrich wood colour and figuring. Diluting enables the oil to penetrate the wood deeper but tends to remove the shininess.
| 03 March 2019 19:29
In an earlier post I believe you called the oil preparation "Boiled Linseed oil and 10% Turpentine". On the European Oak you have specified "Tung Oil and 10% Turpentine". Which is correct or are they really the same just named differently?
Thank you Charles
| 21 February 2019 17:26
Anne - 'Brunley' is the original name for what is now 'Brilley', the hamlet where I live in rural Herefordshire, UK.
| 20 February 2019 00:25
Where exactly is Brunley?
| 02 February 2019 02:23
Well Chris, I must admit that I am amazed at the quality of workmanship in these 3 examples of leaf carving. Right away I have taken notice that you do not need to sand your work nor do you use a knife at any stage. This is a direct opposite of what I have been taught and they called it carving which I now perceive of as whittling. Big difference between the two approaches with markedly better results than what I was taught to produce. You have opened my eyes to a new technique with a huge improvement in the finished product.
Thank you for the video and the explanation as to why and how you approach the work.
| 18 January 2018 02:48
I've watched videos from several other teachers while making a decision on who to commit to for ongoing lessons. They are all remarkable teachers, but I am SO very grateful for the video quality of your lessons. The closeups are so helpful in clarifying the angles, etc. In some ways, it's clearer than being in an actual "on-site" class. Thank you again!
| 12 January 2016 09:25
Thanks for these three projects. As a beginner, about 6 months into wood carving, I really learned a lot by carefully following your guidance with these three leaves. Having spent the past 2 months working on various projects of my own design, I found myself frequently coming back to your videos on basic techniques and sharpening. With these delicate little leaves, my focus was to use the same gouges you used and to keep them razor sharp. I can't emphasize enough to the beginner how important sharp tools are for creating beautiful work, exploiting the qualities of wood, and providing immense satisfaction. After 6 months of practice, experimentation, and investment in various types of sharpening stones and power equipment, I finally have it down. Very frequent and systematic honing is a must! These three projects, which I did in basswood, really enabled me to make a large leap, and now I'm ready to tackle the box tree.
One last question, what kind of wood did you use for the beautiful embryo carving in your book, and how did you stain the background?
| 12 January 2016 09:24
William - That all sounds a great start! Yep, the tools ARE the carving. Look forward to seeing your work in the gallery. The wood was Elm, later gilded, and the background was bleached.
| 27 October 2013 10:06
Majid - Thanks for asking that. I've added a note to video #1 where I should have mentioned it. As a beginner, say, you would want to choose a wood that's fairly easy to carve. I'm using Limewood (Tilia spp.) here but Basswood, Brazilian Mahogany or mild Oak for example will do; anything that is tight-grained but with an open grain structure, which makes it fairly easy to push your carving tool through: even pines and birches. Maple, Beech or Cherry woods are all physically too hard.
| 24 October 2013 21:32
What kind of wood is that?
| 12 June 2013 03:26
Thanks Chris. Plan on having a big bonfire...
| 10 June 2013 07:00
Eric - Well done for having a go and learning by doing! There are so many possibilities when gouge meets wood and we can't cover all of them. One of the best things you can do, when you have a specific problem is to isolate it and make your trial in a practice piece of wood, rather than carving the work itself - where you can lose a lot if you don't succeed. The next thing is to repeat the carving: I know a lot of people don't want to do this but a one off carving, including my own here, will have lots of errors - things I could have done better - and doing it a second time is not only much quicker but usually a much better carving. (Throw the first one on the fire...) What I am trying to do in all these projects is give you a process, a sort of way or order of doing things. Once you've grasped this, and a bunch of techniques, you can tackle a huge variety of work. So, well done again. Just keep carving and learning - from your successes of course as well as the mistakes!
| 10 June 2013 02:22
Sharing my mistakes so others might take advantage of them. I did not follow Chris' sequence and spent time detailing my relief around the leaves (I had three) before I sculpted the three dimensional aspects. The result was that I had some fragile parts of the leaf when I tried to then sculpt the three dimensional aspects. Second mistake I made was not paying enough attention to the grain of the wood (basswood) before I laid out the design. I could have made things a little easier with respect to cross-grain cuts. But I love the learning that comes from making mistakes. Brings the things Chris teaches to detail and consciousness.
| 09 June 2013 04:07
Chris, HELP! I laid out real oak leaves in an arrangement of three on a twig. About 1-foot square layout. Since I traced real oak leaves, they are more detailed than the one in the exercise. In addition, laying out three leaves created some tight negative space between the leaves. So, as a newbie, I discovered two very challenging issues. 1) How to efficiently clean out a concave 3/8-inch undercut and 2) how to clean out small negative spaces with lots of curves. It was fun tripping up on these challenges, as I never would have imagined them without actually putting chisel to wood. Any hints on the best chisel or technique MUCH appreciated. Note that there is a lot of cross grain cutting also because of the complex layout.
| 26 January 2013 20:22
Chris, I really enjoyed doing these leaves. It is a great refresher on the skills of low relief which I still need to continue to practice. "Setting in" is my most difficult part, to get the clean side edges that you get is difficult, but will get better with practice I know. Now I want to go back and try again, possibly with some different leaves. These lessons are so beneficial. Thanks, Chris.
| 12 January 2013 15:54
David - Thanks for the suggestion and yes! - We do have a schedule worked out but I'll try to do something asap. You are right in singling out smaller, meaning narrower, tools. Wider tools struggle, and often fail, to get into narrower gaps (although not the other way round of course). However there is a bit more to it than that and I'll do my best to offer some guidelines.

| 12 January 2013 04:17
Chris,
I recently did a version of this project, and found the biggest difficulty to be cleaning up the background inside the tight curves. I watched the video again this evening to see if you show that particular detail, and you do but once, where the leaf is brought down to the background in the early part of the carving. Can you share some tips about cleaning up these tight places, especially where the walls are higher? I know you mention during your work using small gouges, but is that all there is to do? It's very hard (for me at least) to get even a small square cornered gouge in a tightly curved area like that and get all at once clean background, undercutting and junction with the setting in of the wall edge. Maybe I just need more practice, but if there is some advice you could give for this particular type of detail, Id greatly appreciate it.
David Taylor

| 26 July 2012 18:49
si me gusto su demostracion soy instructora de ese hermosos arte ,y esta bien simplificarlo adelante y exitos
| 13 July 2012 18:43
Paul - It's all relative! We're trying to create a range of carving projects from the 'simple', such as here, basic techniques with just a bit of challenge, to the more advanced, bigger challenge and needing more experience. These projects always look harder from the outside; just give it a go. And then, try it again! See it as a learning exercise, as a lot of the projects on this site are. Enjoy! Better for you the sudoku...
| 11 July 2012 09:36
SIMPLE?
| 20 May 2012 17:31
Nice simple projects.
| 17 May 2012 04:47
What a coincidence! I am working on a rococo style coffee table with oak/flower theme at the moment.I have carved couple of oak leafs so far and it looks like that i am getting hang of it,It gives me a lot self-assurance what i am doing.Thanks for a video.