Menu
As in hand sharpening, power sharpening has stages, steps to take in a particular order - it's really the same approach I take to hand sharpening.
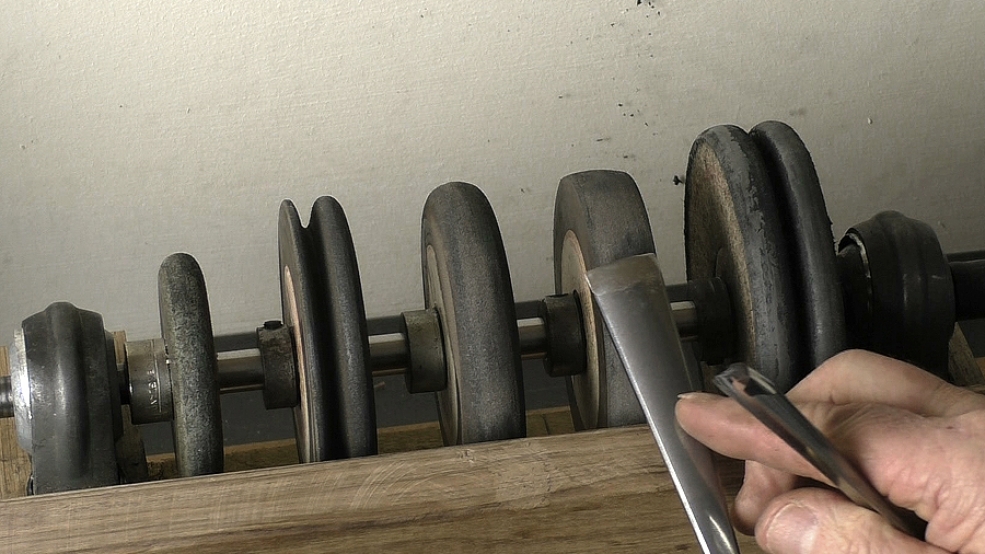
I've added more notes about power sharpening and Cratex wheels in the download - link below.

| 07 November 2023 16:43
Howard - It's the same issue as if you were sanding wood. If you used 80 grit to sand a piece of wood, you'd expect to leave and deal with scratches if you went straight to 240 grit, say.
That's where the abrasive rubber wheels come in; they act as an intermediary. Honing compound is very fine and only removes a small amount of metal and needs help - or a very long time at the wheel...
From the 80 grit you could try swapping the belt over to 180, say, before the honing complound. I know that's a bit of a drag but the grinding stage is something you only need to do when you are commissionng the tool; after that the honing compound should keep the bevel polished and edge keen.

| 06 November 2023 20:35
Hi Chris,
Still having some troubles with this. I am using a belt sander/grinder similar to the machine that you are using. I use an 80 grit belt to shape the outer bevel, which works well. The trouble I have is that when I go to a hard felt wheel with honing compound to polish the bevel after shaping, it does not take the 80 grit scratches out. Do you use some kind of intermediate grit wheel or belt between the 80 grit and the felt wheel or am I doing something wrong? Thanks.
| 13 January 2023 11:28
Howard - For the fast wheels you really need one of those hard blocks or sticks of abrasive designed to melt with the friction. In my experience the softer stuff which I add to my bench strops doesn't stay on long. And as to the different hard abrasive sticks on offer, there really doesn't seem to be much in it, so you'll need to experiment a bit.
Remember not to press too hard, even on the hard felt wheels; tools edges can heat up quickly!
| 10 January 2023 16:18
Hi Chris, I'm just transitioning to using power sharpening in addition to hand stones. After you shape the bevels on the rougher wheels (or belt sander), what type of compound are you using on the felt wheels to finish the bevels (which, if I understand correctly, is the replacement for the translucent Arkansas stone). I assume this is something with a "rougher" grit than the green compound used to strop the blades during use?
Thanks.
| 23 August 2021 15:21
William - When you use a gouge without an inner bevel, the edge dives into the wood - there is no heel from which to pivot out of the cut. Even I micro bevel on the inside would help - and of course my style of carving builds on this.
The only purpose I've found for not having an inner bevel is in pea mouldings, where the edge has to make an extreme 90 degree turn to create the 'pea'. Having the edge diving in helps. Though to be honest, I can equally carved them with my normal inner-bevelled tools. Best to try the tools without a n inner bevel and make your own assessment of the value?

| 22 August 2021 14:16
Thanks for your helpful reply, Chris. I see a lot of carvers consistently resorting to fishtail gouges, presumably because the thinner bulk of tool edge. Also, I have noticed that the fresh delivered Pfeifer slips through the wood easier because of the lack of inner bevel. Is there a role for some of th3 gouges in the tool kit to be shaped free of an inner bevel?
| 15 July 2021 08:50
William - That concavity is what I call a 'hollow bevel'. It's actually a good thing in a carpentry chisel which is used with the bevel up, but on carving chisels, which work (outer) bevel-down, it's counter-productive. It doesn't matter what grinding system you use - although the bigger the diameter of the grinding wheel, the less the concavity.
Follow me here:
A carving tool works off that outer bevel: the edge cuts into the wood, the handle drops, the blade pivots on the heel of the bevel and the edge comes out of the wood. Can you see that a rounded bevel would actually make that action easier, whereas a hollow bevel would work against that scooping action?
But we don't want a rounded bevel because that means an increased cutting angle, a fattened 'wedge' of metal trying to push into the wood.
The balance lies in a flat, single bevel with a softened (rounded) heel to pivot on.
Your bevel can be slightly rounded at long as that cutting angle is low. I always say aim for 'flat' because it's very difficult to prevent that little bit of rounding through stropping anyway.
I hope all this makes sense! I guess the bottom line is to try it out for yourself and see what happens to the feel of the tool.
| 14 July 2021 16:44
Hi, Chris. When sharpening a gouge with the Tormek T7, a slight concavity forms from the tool edge and along the outer bevel. I have removed this by flattening the concavity employing bench stone honing.
But is it necesssry to flatten the surface of the outer bevel? Does the slight concavity interfere with the function of the gouge? What is the best way to get an optimal result using the T7 gouge jig?
| 05 November 2016 11:23
William - Yes, that's an added factor: we all wear out!
And of course some parts get used more than others so, with a belt for example, the edges are often less worn and so you have options across the belt.
| 03 November 2016 01:11
That's interesting. Thank you. I do know that any given grit will become finer and finer with extended use.
| 01 November 2016 12:13
William - It's 80 grit, that's a good number for shaping purposes.
But here's something to consider: it's as much about how you use the belt as the grit on it:
Think about that 'grit' as crystal. Under a microscope the surface of the belt would look like a mountain range, with peaks of cutting edges sticking up. The very tops of the crystals - the most outer surface if you like - like the mountain peaks, are quite spaced apart and fine. Down the mountain, there's more mass, more peaky surfaces.
So, if you press lightly on the belt you'll just be using the fine points of the crystals, the peaks of the mountains, and the cut is light - you can use it for delicate work. If you press harder on the belt you are using more of the crystals and the cut is more aggressive (as is the heat!).
In other words, the same grit can be made to function differently.
| 31 October 2016 14:21
Chris,
What grit sandpaper do you use on the belt sander? Apologies if you had mentioned this elsewhere. Thank you.
| 21 August 2016 12:31
Jeffrey - Well, here are a few reasons: I've used this sort of system for about 25 years and the rubberised abrasive wheels are still going strong - they are good for their whole diameter and even now are only a little worn. Diamond wheels will wear out - they are only as good as the way the grit is fixed to the metal. Most importantly, I can shape the Cratex wheels to fit any inside bevel, and that's what really takes up the time when sharpening by hand.
At the end of the day, it IS important to try different things - I'm sure there are many other ways of getting the job done- and if the CBN wheels work for you, that's great. We need to get through the sharpening as quickly as possible so we can get on with the carving.
| 22 July 2016 13:41
Thanks Chris. I found just what I wanted
| 21 July 2016 19:35
Joe - In these videos, I'm just looking at the equipment. Please see the No Fear Sharpening and Pye-Cosman DVD lessons as well as the various downloads on sharpening in the About > Downloads page for everything else!
| 21 July 2016 19:32
Tor - I've not used a slow speed dry grinders but common sense (or is that physics?) would say that at half the speed the friction would generate half the heat, so a bit 'safer'. If I had a choice which one to buy, I would go for the faster one. In other videos you can see how I use my finger to keep checking the temperature of the blade and dip in cold water frequently, not letting it get above warm, so overheating the metal doesn't have to be a problem.
| 20 July 2016 22:19
I may have missed it,but what angle are you putting
on the inside ?
| 20 July 2016 13:25
Chris,
Thank you. Yes I am well familiar with Water-cooled systems (such as Tormek), but what I ment was Dry "slow-speed" (1400rpm) Vs Standard (2800rpm)
Cheers,
tor
| 20 July 2016 13:18
Tor - Slow speed, by which we normally mean water-cooled are... slow, but safe; you cannot overheat the blade. High speed (dry) are fast but you need lots of care to avoid overheating. I've always been happy with the high speed, and they are a lot cheaper for a start.
| 20 July 2016 13:16
Geary - Cratex. Details in the download or do an online search. You shape them with a grinding wheel,'dressing stone' - with dust mask, vacuum extraction etc; you don't want to breathe the particles.
| 20 July 2016 12:38
Chris,
Thank you for these new series on Power Sharpening. Very clear end informative! (As always:) Do you have any thoughts on Slow Speed Vs High Speed grinding Wheels?
Greetings from Norway,
Cheers,
tor
| 20 July 2016 10:07
Question: Where are the "crafex" (spelling not certain) available? Are the shaped out of the box? If not, how do I shape them?
Thanks. Geary
| 20 July 2016 09:26
Interesting set up for power sharpening. I recently bought a Worksharp system which actually allows you to see the material being removed from gouge as you sharpen it which is useful for carving and some turning tools. It also makes it easy to get a reliable and repeatable edge on straight edge chisels & plane blades.