Menu
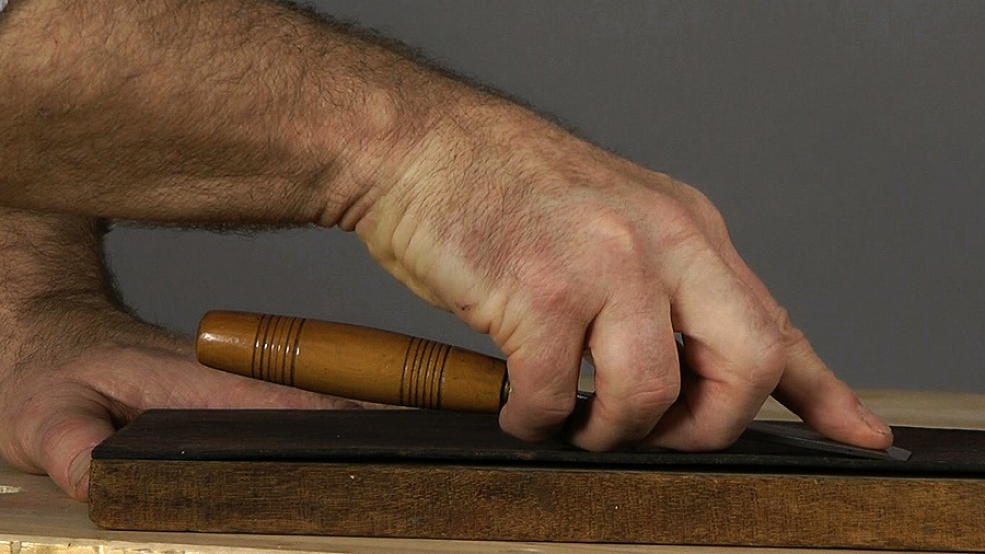
In this lesson I'll show you how to use bench and slipstrops correctly - and there is a correct way! Remember, keep that low cutting angle!
Caution! Sharp carving tools versus your soft flesh? No contest! So: keep the hand supporting the strop away from the line of the blade as it moves. Be mindful and look after yourself. Learn a safe technique. Strop slowly and carefully at first.
For more on strops, see my book, Woodcarving Tools, Materials & Equipment', vol. 1.

| 12 October 2022 06:57
Chris - It was quite a job getting Ashley Iles to put any inner bevel whatsoever on these gouges! You have to see it as getting you going, rather than definitive - all carving tools are sharpened by non-carvers, so you need to make your own decisions here. I would draw the inner bevel back, ie lengthen it and so lower the angle.
You can do this while creeping up on the edge and stopping there. The point of the inner bevel is to strengthen the low outer one and enable the tool to be used upside down.
Slipstrops:
Very easy, and quite fun, to make!
1. Find a piece of scrap wood a little thinner than the tool and deep enough so you can keep your fingers clear when using it. Long grain along the stropping edge.
2. Use your gouge upside down to profile the edge. Sand smooth.
3. Glue the thinnest leather you can find over the profile - wood glue will do, sanding off any finish on the leather. You only need the leather on the part that will be in contact with the tool
4. Strop paste to the working edge only.
You'll find narrower slip stops will fit wider tools but not the other way round. There is no 'set' of strops - just make them as you need them. You'll end up with a range to fit different sweeps for whatever tools you use in your carving.
More details in my book, 'Woodcarving Tools, materials & Equipment'.
| 11 October 2022 21:38
If the inner bevel is 20 degrees, which is the angle on your excellent 2 1/2 finishing gouges made by Ashley Isles, should one still strop the inner bevel with quite a low angle, as recommended in this tutorial? Or should one strop the inner bevel at the higher, factory-set angle of 20 degrees?
Also, could you please offer a step-by-step video tutorial on making profiled slip strops? What's the best type of leather for this application (split or unspilt), its maximum thickness, the best adhesive for gluing the leather to the profiled block, and your method for attaching the leather so it all fits snugly? Thanks ever so much.
| 21 July 2022 18:20
Maurice - No, what I'm saying is that carving, turning and carpentry tools have different needs to accomplish the work they do, which means different profiles.
So the cutting edge of say a woodturner's spindle gouge is 'nosed' - it looks like a thumbnail - and the bevel is hollow ground. A carving gouge has a square edges, flat bevels, and two of them - inner and outer. A carpentry gouge has a dead flat face, hollow bevel and only used one way up... and so on.
So, you need to see them as entirely separate and learn about each craft without comparing.
Hope this is clear!

| 19 July 2022 09:28
Thank you. What you are saying is: if I'm carving, I will sharpen with a long bevel and when I'm woodturning I sharpen with a short bevel? And carpentry is different again? Maurice
| 18 July 2022 16:13
Nicolas - Very sorry to have missed your question.
Stropping is the very last thing you do, AFTER using your Arkansas stones. So you would well the blade well and go to the wood.
You want to test the blade and find it cuts cleanly on spare wood before you strop; the stropping is really a final slicking up; it really doesn't remove metal in the way the stones do. It doesn't matter the make of strop paste but if, after you've stropped, you are actually not that happy with the sharpening and want to go back to the stones, then, yes, you must clean the blade first to prevent clogging up its surface.
And if you ever do find your stone clogged - glazing over and losing it's bite, say from letting the oil dry - more oil should loosen every thing up for you to wipe it clean.
In the worst cases - say you've found an old stone -you can you wash the stone with kerosene or petrol.
| 18 July 2022 16:02
Maurice - Although they may look as if woodturning and woodcarving are interchangeable, the tools, bevels and techniques are completely different. You want to see the two crafts as entirely separate in your mind.
(Actually that's the same for joinery and bench chisels.)
| 18 July 2022 10:19
Is the bevel of wood-turning gouge the same angle as a carving tool?
| 29 October 2019 19:07
Are you concerned about spreading strop paste on your sharpening Arkansas stones? I am using paste pre-made, it’s a green color. Some of it comes off on the chisel, and i worry it will rub into the sharpening stone and ruin it.

| 02 February 2014 20:09
The "ink" test was the answer. 5F does not need much rotation to cover the bevel. I've developed the habit of stropping the flatter gouges hitting the top of the strop flat on, and rotating it slightly to the right and then slightly to the left on the next stroke, an equal number of times. The ink showed that I am starting the left stroke farther up the bevel, rotating the bevel more or less the same as on the right, which means that the left corner is being pressed into the strop a lot harder than on the right. I had no idea I was doing this. The strop is horse butt on MDF and the paste is made per the instructions on this site i don't see either of those being a problem. Thanks for a good tip. You've saved me a lot of unnecessary re-sharpening.
| 31 January 2014 08:45
David - Assuming you didn't break off the corner, which you'd have noticed, consider this: All sharpening is about the controlled removal of metal - yes? So, there can only be one thing happening to round off a corners: you are removing metal from it... So the questions are, with what, and when? One can ask these questions at any stage in the sharpening 'process' of course, but here you know it's when you are stropping. Somehow, because you are rotating the handle too much, or perhaps the strop leather is too soft, you are working the the left corner more than the right! Ink over the bevel and strop once or twice, that might demonstrate the pattern and you can adjust your action. And check your strop? - it wants to be hard, only a wee bit softer than your benchstone.
| 28 January 2014 15:25
I've been working on a corner leaf (flower actually) some what similar to the ones you were showing Rob in the DVD. After some experimentation, I have a design that I have been practicing in walnut, the intention being to place it in the upper square parts of a cabriole leg for a table I am making. The right chisel to round the pedals is a 5f-12. I've practiced this design many times and started out with this chisel in perfect condition, only stropping. I noticed today that the left corner of this chisel is rounding.. off, leaving some bits at the bottom of the root to be removed with each cut. I know how to fix it, but I was wondering if I am doing something wrong in the stropping or if this is just the natural "wear" under the circumstances of this use?
| 15 March 2012 19:43
Thank you so much for this demonstration! I am a visual person so this is very helpful to me as a beginning carver. All of your videos are very useful and concise. Thank you for sharing your knowledge!