Menu
Details...
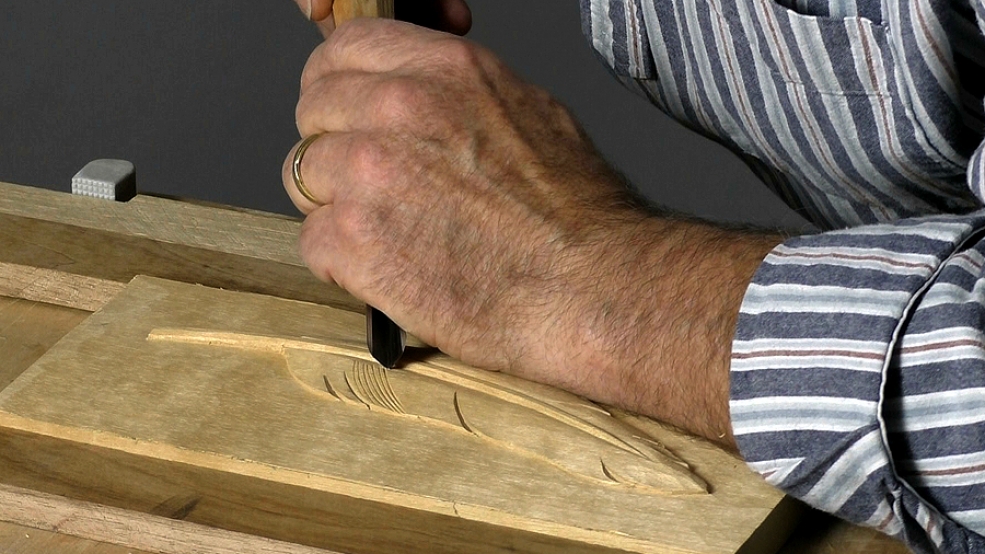
Details always go in last after the shaping or modelling. Here we'll add some light lines to the feather with a V tool. Another tool tht is good for this is a 'veiner', a narrow, deep U-gouge gouge (no.11 x 1/16in. 2mm). Note how I pivot on the heel of my hand to carve a smooth curve.
Link to: Making your own beeswax.
Note: I don't say it in the video but it's a good idea to seal the back of relief carvings too. Don't use wax; it will tend to leave a greasy mark on the wall. A simple acrylic matt varnish from DIY stores is my preference. You can use shellac ('button' or 'French' polish) too if you don't mind a shiny surface...

| 22 November 2020 18:27
Cecil - Not quite sure what you have in mind here. Write to me using the Contact Form (drop right down to the bottom of this page) and tell me what you are thinking and perhaps we can make a video in the future.
We love suggestions!

| 22 November 2020 01:52
Hi chris. Could u please show us some ideas for a finish border to the relief carvings. Thanks.
| 13 February 2019 08:49
Charles - Look at the text below the video and you'll see a link to the feather download, which has the pattern, tool list and so on.
And if you go to the About > Members Downloads page, you'll find a full list of the working drawings/downloads available for projects and other matters on the site.
At the time of writing there are 77 of them, which should keep you busy!
| 12 February 2019 23:20
Is there a list of patterns, such as the feather?
| 03 February 2019 03:33
Great project. I can't wait to jump in with both feet. Your narration as you carve helps to remove the mystery.
Thank you
| 26 August 2018 11:21
Susan - The best way to carve your stand-alone feather is to use the 'paper sandwich' method of holding the cut out blank.
Essentially you glue thickish paper between the wood you want to carve and a backing board, clamping it all together. You can carve right down the edge of the feather, and undercut, into the backing board without any breaking away as the whole thing is supported. Then, when you are done carving, you split the paper with a spatula and the feather will pop off.
Put 'paper sandwich' into the search box (above left) and you should find lessons on the method and projects where I have used this very traditional technique.
And let's see your feather in the gallery!
| 24 August 2018 17:31
I want to carve a feather but not as a relief. Could you cut the shape of the feather glue or tape it to a board and continue just as you did this one. Would there be a problem getting it off the board when finished?
Thanks for your imput on this!
Susan
| 11 April 2017 14:49
Benjamin - Yes, undercutting would lift the feather from the background and make it feel a lot lighter. In the picture above you can see a 'wall' around the feather; you could cut that back - about 30 degrees would do it.
As for relief carving in general, there aren't really numbers you can fix depth. The lower the relief (and nearer to drawing), the more you need perspective and visual 'tricks' to create any sense of depth. As the background deepens, you can start playing with light and shadow and real depth. Eventually parts become fully 3D.
| 10 April 2017 20:17
Chris - Probably not necessarily for the beginner, but would you consider undercutting the edges of the feather to enhance the illusion of "thinness?" I was thinking about a couple of millimeters or so.
Secondly, is there a minimum depth for the relief (background) that would still give the illusion of depth one is looking for?
| 28 December 2016 18:47
Wynne - Yes, I would make sure the edges were neat.
As for the back, thanks for asking about that and apologies for not mentioning it:
Because the carving lies against the wall, the back is effectively sealed so I wasn't to concerned about it. However, it IS a good idea to seal the back of a relief carving too, so the whole piece is sequestered for the air around. I wouldn't seal the back with wax as that tends to come off onto the wall and leave a greasy stain. The best thing is a matt acrylic varnish which you can get from DIY stores. Failing that, shellac ('button polish', also used as a knot sealer) would do.
| 27 December 2016 18:21
Do you ever finish the edges? I've done since it looks more finished when hung. What about the back? B