Menu
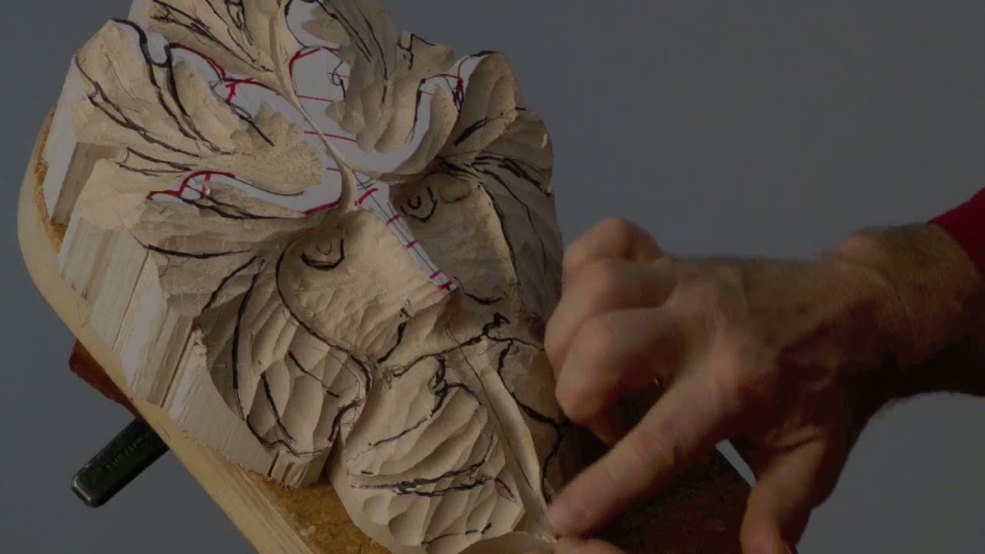
A 'second pass', establishing and refining the form. Use narrower tools. Keep the design 'unfocussed'.

| 02 August 2022 01:12
Michael - Yes, that must be a bit frustrating. I'm sorry we can't go back and include the views you wanted but here are a couple of thoughts that might help:
If you go to the final video: Finishing, you'll see I hold the carving up and move it around so you have a side view and then, later on when the head is on its back, you can see the end view pretty much.
You could try pausing the video and printing off a screenshot to have with you for earlier videos, to help you orientate?

| 29 July 2022 05:45
I wished you showed side view and bottom view from the chin to rest of the face view. To give myself much better view to give me clear relationship of profiles. I am deaf, read lips but not quite easy for me to understand what going on. had to repeating the videos over and over... takes too much time. still very interesting subject to carve. Mike G.

| 21 April 2014 09:44
Well, as I'm moving through the measures with my first Green Man, I must say that 2 of your phrases, reinforced throughout the project, keep ringing in my ears and becoming the lesson that I'm taking from this carving series: "merge in..." and "set-in by matching". Thanks!
| 27 December 2013 14:35
Eric - People often think I conceive of a carving - relief or in the round - in its totality and then somehow go and 'find' it within the block of wood. That's far from the truth. Although I usually have (more or less) of sense of where I am going before I start (conceptualizing, as you put it ), I actually make a lot of it up as I carve! It's rather like a painter: although they have the idea to paint a landscape, and it might be right in front of them, the final painting emerges as a result of the process of painting - making it up as they go along. I hope that's clear. I do make a model sometimes but it's usually pretty rough and, even if it weren't, I have always stopped looking at it about 1/4 of the way into the carving. So, unless you are slavishly copying - and you say you don't want to do that - all you need are a few good reference points to get you into the wood (bosting) and then just... carve. There and then. All you have to play with is light and shadow, which is depth, which is removing wood. Feel for the forms, visualise them as you carve, and the depth will look after itself - though you do want to work with your full thickness of wood; otherwise why didn't you start with something thinner? You've seen my approach of keeping everything 'soft' and 'unfocussed' to begin with, then 'focusing' to finished edges and surfaces and finally adding details. This loose approach can be quite daunting for some carvers, quite a challenge letting go of the safe shore that a 3D model represents, but it's by far the most rewarding in the long run. I'm sure you have a 'good enough' eye to carve like this. Relax and trust it?
| 25 December 2013 20:19
Chris, I have a big picture question (might be a lesson?). I am challenged every time I start to conceptualize a deep relief carving, including this one, assuming I will modify the design (a quirk of mine). With a full 3D carving, I have a model and I can take reference points from the side view (or other views) and lay them out accurately on my wood, hence determine relative depths of the subject and the perspectives. With front view only starting points, such as a sketch like yours, or a modified drawing and concept of mine, how do you start to determine the depth of parts of the relief, other than "having a good eye", with seems to be my only approach, other than creating a clay model. I have seen your glass panel depth and layout scheme in your books, but that is from a model. Are there any techniques or tips you have, because the depth and perspectives are a critical part of the relief carving. Thanks.
| 17 January 2012 22:17
Sharon - You have it right: it's really just so you can see what I'm doing more easily! Actually the ink dries so quickly that it only penetrates the wood superficially - but it's so thick! I tend to use a finer ink pen, something that dries rather than smudges. Pencil, for example, tends to get rubbed into the wood and make the surface dirty.
| 17 January 2012 20:08
Hi Chris, can I ask, do you always use markers to draw in your lines or is it just so they are easily seen in these videos? The reason I'm asking is I would have thought that the ink would bleed fairly deeply into the surface and mar the final piece.