Menu
'Plane talking'. Not a spelling mistake!
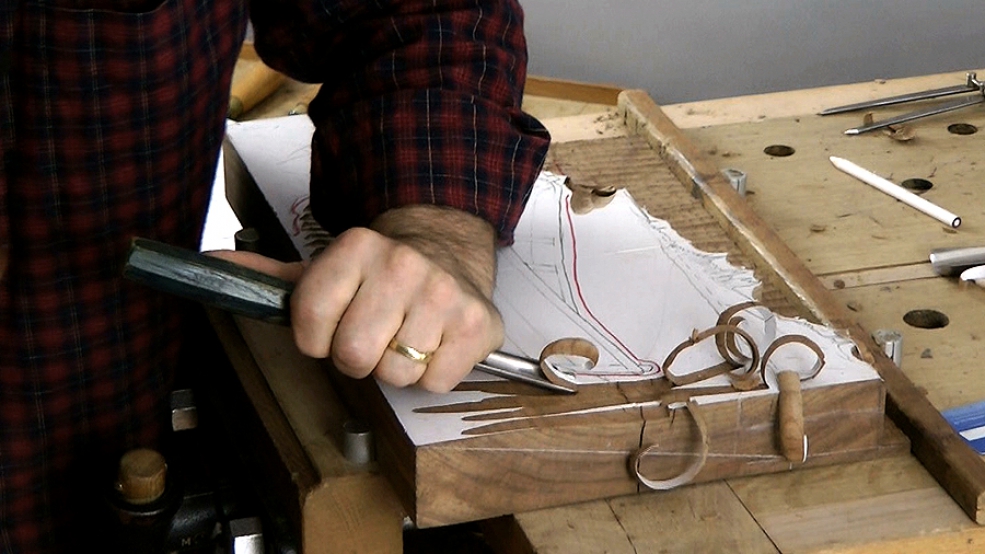
Understanding, establishing and joining the planes, the fundamental surfaces in this carving, is crucial and I hope to lead you through the logic of it step by step. The principal planes of this carving, front and back, are joined by another plane, that of the beach and sea. The slope of the beach and sea out to the horizon is the main foil against which the rowing boat sits. We need to establish this before we can match the perspective of the boat.

| 31 August 2014 10:27
By the by, for others who I hope are doing or going to do this wonderful project: the marking of the angle on the right side after measuring it on the left is very userful, but don't do my mistake: use only pencil and not marker on the end wood!

| 09 August 2014 09:30
Ann - I'm no longer in possession of the carving but as soon as I get it back I'll do that. Sorry, it may be a while. A bit late but, if you have another go - and I'd strongly urge you to carve a second, having learned so much from the first - once you have established the plane between the front and rear gunwhale lines, and start 'hollowing' between the gunwhales and into the boat: place the seat early. It is easy to get focussed on hollowing out the dory and not on the bits you need to leave - the seat, the struts and so on.
| 07 August 2014 11:39
Sudoku mindset and all, this is a fun but challenging project of perspective. I think I missed it some on the seat... Is there a way to add a photo from the right side to the PDF file?
| 07 August 2014 10:19
Ann - Sorry we missed that for you! It's a continual problem: trying to show everything I do, or what someone might need, in a project; and no doubt there's always some move or view we could have shown more of. And once I've carved it off, it's not possible to go back as we condense hours of work into minutes. One of my hopes is that what's needed in the 'gaps' is obvious or at least a viewer should be able to work it out. Going back to the plane of the sea behind the boat: the plane as it is on the left, from forground to horizon, is THE PLANE - you can't change or bend it. This descending passes behind the boat to the shore, and because the shore is essentially in the smae plane as the sea, the shore sits at the same depth at this point. As the plane of the sea/beach hits the curving line of the hills, logically, that it the depth of wood you need to leave there. The hills then get shallower as the line at their base curves back to the horizon. The hills themselves keeping the vertical plane of the sky, which is also the plane of the original front of the carving.
| 02 August 2014 13:51
Chris, thanks... it helps as I keep looking and studying it all. I feel like I would have really been helped by a few more minutes of video here letting us see you do the right side, which is the tricky part between respecting the logic of the sea's plane and allowing for the curve and the mountains. I realize that minutes of video are probably $ú's, but I had to keep hopping back and forth between Sea Bosting and Background 1 to try and get it all in my mind. I did quite a number of screen snapshots of a few seconds here and there so I could study the right side. It's a wonderful job from both of you, I just feel like I needed just a tad more here.Thanks.
| 31 July 2014 17:26
Ann - 1) Eventually the island on the left (as you look at it) wants to come down to about 2mm, more or less the on the horizon line, which is little step back onto the plane of the sky. 2-3) The plane of the sea slopes down to the horizon on the left - and all across to the right of course. On the right, the plane is interrupted by the curve of the mountains at the beach. You can slope the mountains towards their peaks a little (because the peaks are further away than their bases) but from the thickest depth of the mountains, which is on the right, the whole range must gradually get shallower as it moves left towards the horizon, following the line of the bay as bay and horizon converge. The 'islands' at the very end of the range are as shallow as the isolated island on the left. I hope that makes sense! Establish this logic of the mountains then reduce the plane of the sea to meet. You cannot 'curve' the sea to make it fit, or the sky; both must remain flat planes. A lot of carvers have found the perspective here a bit mind bending but remember: if it doesn't look right, it most likely isn't!
| 31 July 2014 14:32
Chris, a couple of questions as I'm working on this phase: 1) how much height does one leave on the island area? 2) how much have you boosted down the plane on the right that curves back up to the mountains? 3) I presume that the horizon then is boasted across to merge these two "depths": the deep left horizon and the nearer mountain not-yet horizon zone - right? Thanks!
| 15 April 2014 06:25
Dennis - I'll often try to work around a crack: cut or carve it out, and will modify a design to use a nice piece of wood. In fact, trying to get the best out of any piece of wood is a fun part of the challenge. It's actually unusual for me to carve with a crack like this but I mostly find that once the crack has happened, which means tension in the wood has been released, it doesn't develop further. And that what you really want: no tension in the wood. If there is and you glue a split back together, either it is likely to work open eventually or a crack will pop up somewhere else. Because CA glue is so thin, it is only effective with hairline splits and then, yes, I would use it where I thought the split was stable, 'just in case'; the sort of split or 'shake' that will disappear with wax.

| 14 April 2014 16:14
Speaking of cracks, Chris would you comment on using CA glue to stop or prevent further cracking. Would you use it or not? Agree with Eric's comments above.
| 21 February 2014 12:57
I never would have thought of the second plane of perspective in the background mountains. This lesson really helped me understand multiple points of perspective and how important they are. Second, maybe a minor point for others, but the fact that you did not reject this piece of wood because it had a crack is encouraging. I have some beautiful pieces of wood, but often with one crack here and there. Now I feel free to use them (and repair later). Sounds strange, but your lessons "give me the courage" to do get in there and remove wood (and what not to remove).