Menu
A house sign with a difference.
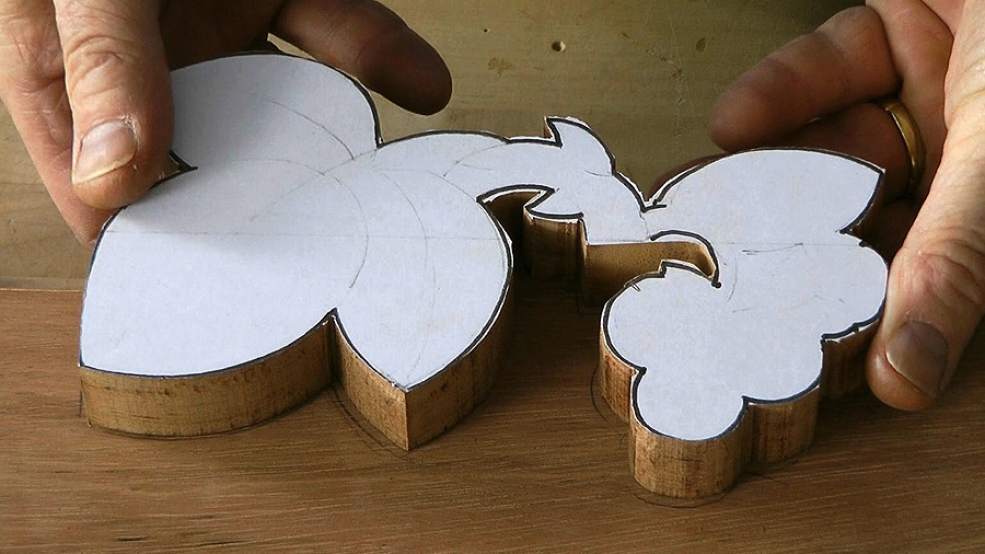
Carvers often miss a trick when it comes to signs by just sticking to the lettering. There's often scope for a 'little extra'. Here's a house sign with a difference: a bramble curls over from the back. Obviously, if you don't need a sign saying 'Bramble Cottage' you might think this project is not for you. However, there is a lot to learn here and, as with all the videos on the site, I hope you pull out techniques, approaches and inspiration that you can apply elsewhere.
In this project I'll show you how to create a relief carving without clearing away background. Besides saving all that tedious work you'll save money by using a lot less wood! Also, the bramble would look great on a mirror or picture frame!
Wood: I'm using a salvaged board for the sign. It seems to me like Teak, or of that family, but smells a bit more like Mahogany, which all goes to say I have little idea what it is. I do know that it's very dense and heavy; very hard and very oily. The hardness necessitated the use of my mallet a lot. The density and oiliness made me certain it would be a great choice for outdoors, and well worth the extra effort. Thickness of the board is about 1in. 25mm.
Font: Papyrus, straight off the computer but re-spaced after printing. In this lesson I introduce the project and glue up ready for carving.
Working Drawing: Below, subscribing members can download a PDF of my working drawings: the profile of the board and add on piece; this should print actual size.
Tools are nothing unusual and you'll find them flagged up on screen in the lessons..

| 16 October 2013 12:39
Harold - Actually that IS worth saying, and thanks for saying it. Yes, do look through the whole project first if only so you know what you are letting yourself in for! And, yes, sometimes visualising is difficult. The best thing to do then is make a sketch model out of clay or plasticene - any time or point in the project. It doesn't have to be perfect but it will help you wrap your mind around what's supposed to happen. I'm sure you'll score lots of brownie points with M-in-L. Well done all around!

| 15 October 2013 13:10
For what it's worth; I cut the pattern size to 50% and am using it for the top end of a Flame Maple cutting board. The concept and appearance I like a lot; my carving is just OK, but good enough for a Christmas present to my Mother-in-law. Ha, Ha! I should have done two things to improve my carving. First, I should have viewed ALL the videos before starting, not just two or three ahead, as I did. Second, I struggled to visualize the final product until I did a screen shot of Chris's final video of the Brambles and that helped a lot. The videos are extremely helpful, especially with some of the techniques that Chris include (for example, using a flatted nail to push the bottom of the area below the vine completely flat). Watching Chris do his slicing cuts has improved my own technique; just one more reason to watch all the videos in a series. Harold

| 18 April 2012 20:56
Thanks much for showing these simple steps so clearly. I've wanted to thicken wood in areas but wasn't quite sure how to do it efficiently. Now I know... and that obviously I need to practice my bandsawing skills a lot more!
| 25 January 2012 19:10
Philip - Yes, I didn't wipe away the glue. On the edge of course I carved through it. On the board surface, I later carved it off with my flat gouge down to the board surface and up to the junctions. PVA cuts away very cleanly and doesn't hurt the cutting edges. If I'd wiped the glue, the chances are that I'd have smeared it on the board anyway. But, at the end of the day I'd rather not do work - even wiping excess glue - if I don't have to!
| 25 January 2012 19:05
Deborah (January 19, 2012 05:01) - I think you are right! I've since looked it up and Eucalyptus spp. and, yes, it must be. Good call!

| 23 January 2012 14:05
I noticed the excess glue wasn't wiped away. Was that done on purpose?

| 19 January 2012 17:46
Not at all. The scented oils you refer to are the distilled essence of the crushed leaves... Chris' description of the wood above (including "smells like mahogany") is what got me thinking... The pinkish to deep red, the circled pores and the long open character of the grain in the video closeups are distinctive to eucalyptus. Hope this helps...
| 19 January 2012 12:00
Deborah,
Doesn't eucalytus retain it's odor for some time in the cut lumber?
| 19 January 2012 04:01
On the topic of the wood... after studying the videos, the wood appears to be eucalyptus (marketed as "Lyptus" to the wood-using industries).
It is a very fast growing South American tree being harvested in 14-16 years of planting (wow). It vaguely resembles" some species of mahogany but that is where the similarities end. It is very hard, quite heavy with a long fibrous grain that is quite brittle (so brittle in fact that our staff in the shop used to whittle it into toothpicks at lunchtime). It is most commonly used used for flooring. Although I am now retired from cabinetmaking, we used to offer it to our environmentally conscientious clients as a sustainably green alternative to mahogany and can also be stained to a golden brown to resemble teak.