Menu
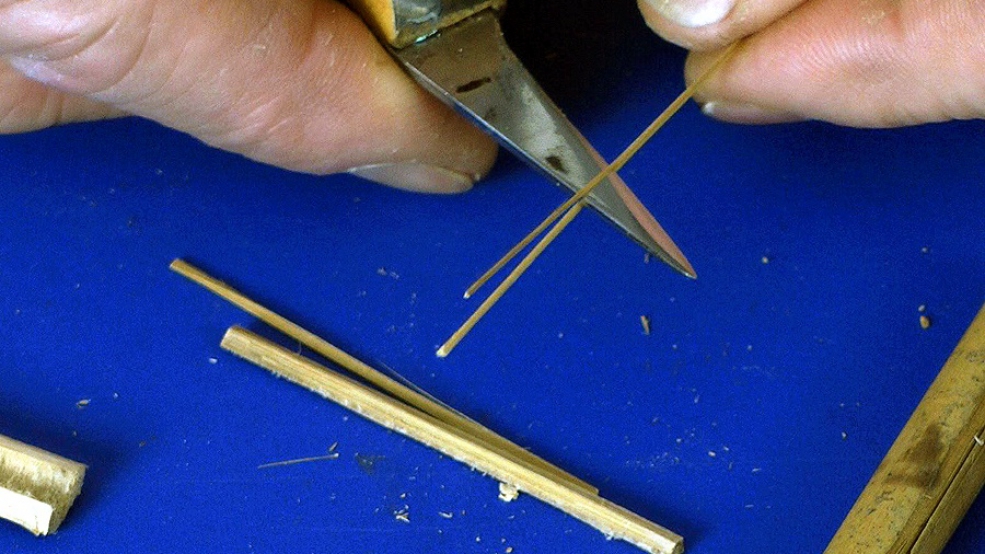
Antennae, which I make from bamboo; finishing with a linseed oil mix; and mounting on a piece of hedgewood.

| 16 October 2017 16:31
Thanks Chris... You are right: I can only "lose" a piece of wood! And learn a good way of NOT doing something. Thanks for making this point, and for your advice!

| 07 October 2017 09:24
Iria - First things first: courage.
It's a small piece of wood! The worst thing that can happen is you mess up in some way and have to start again. So do relax and have a go. Indeed, have several goes until you are happy with the result. It's the only way to learn.
Dragonflies - If you make an image search you'll find all sorts of examples. They have to be heavily stylised; there is no way to capture that ephemeral transparency of a dragonfly's wing in wood, but if you can get the viewer to 'suspend disbelief' they can look pretty convincing.
You are right to flag up grain strength as a potential problem. The body and wings are at right angles so one or the other element is going to be very weak in a completely 3D dragonfly.
I think your best bet is to carve the body and wings separately and attach as you suggest. If you think how strong a match or pencil is you can see that the body, thin as it would be, will be plenty strong enough. You can use different wood for the body and wings. Your problem will be holding the pieces to carve...
Hope to see some in the Members Gallery!
| 03 October 2017 19:59
Hi Chris... Amazing how thin you are able to make the wings! I am wondering, if I even have the courage to try this.
I would like to make also a dragon-fly. I think that the body, being so long, will be too weak so maybe I will need to make the body and the wings in two "with the grain" parts, and somehow attach them. What do you think? Thanks!
| 11 November 2014 18:10
Amazing result. Apart from being a nervous wreck I'm absolutely humbled by your expertise. Although I've worked wood all my life making bespoke furniture, I've never carved a thing until recently. However, I am practicing all the time on scraps, well, some of them don't begin as scrap, but, they sure as hell end up on the fire!!
As everyone else says, thanks so much Chris and Carrie for this massively inspiring site. Long, long may it continue.
Pete The Wood Servant
| 31 August 2014 22:39
Chris, I tried a butterfly out of a softer wood (basswood) as you suggested in Rockland in order to get some light to shine through it, but after doing the first one in curly maple, I didn't like the outcome of the basswood. Too weak as I went thinner. Now am trying sassafras. Fun to experiment with different woods!

| 08 February 2014 11:51
Well like those before me said this journey was Nail biting and your finish product wonderful. If you hear some strange noise over where you are don't worry It's probably me screaming for wreaking my moth many times lol.

| 19 April 2013 18:09
william.did you mean peter grice ? when I was a young man learning my trade we tried all sorts of things to stop this annoying blade rotation , from bits of bycycle inner tubes to bits of thin leather otherwise ueed for strops and thicker pieces of leather from old belt drives from some of the shop machines. But now all you need to do is go to a store that sells air compressers and assesories and they should have plenty of rubber '' O '' rings.of all sizes, select two that fit snugly over the two pins that pass through the frame of the saw ( blade removed ) and replace them so the ''O'' rings are traped between the outside of the frame and the flanged end of the insert that holds the blade so when you thighten the blade the flange compresses the ''O'' ring against the frame and stops any rotating.

| 18 April 2013 02:58
Chris. This is a seminal video for all time. It has lessons for anyone who might deign to emulate the 17th century Grindlings Gibbons's style carving, perish the thougtht! I offer a Niagara of thanks.
| 18 April 2013 02:48
Would it be possible for Peter Grove to elaborate on the "O" ring upgrade for the coping saw?
| 24 March 2013 20:30
Mine is in my profile pic. I made a vase out of this huge bamboo that grows in my yard and stuck it on there. Can't believe I made that. And mostly with a coping saw!!! Thanks Chris.
| 21 March 2013 18:54
On the use of coping saws I would like to offer the following observations. You will never cut acurately if you use short hurried strokes. Always use the full length of the blade with slower strokes.Let the saw do the work. This applies to all saws.Another tip is, try reversing your blade so you cut pulling towards you and yes the rubber 'O' rings really works to stop your pins from twisting
| 20 March 2013 15:23
Well done, good sir! Inspiring to say the least!! Thank you.
| 19 March 2013 07:08
Kevin - David, who comments on Moth #5, gives us a link: http://cornishworkshop.blogspot.com/2012/01/oooo-la-la.html to a great idea for preventing coping saw blades twisting in the frame. Do check it out.
| 17 March 2013 20:57
Kevin - Yep, bit scary, but at the end of the day it's only a piece of wood! You'll be pleased to know that we have just filmed a technical clip on using the coping saw. It's in a queue and won't appear for a few months I'm afraid but it'll answer these questions. In the meantime, make sure the handle is fully tightened and the long pins at each end are lined up at all times - keep checking. And take it easy!
| 17 March 2013 14:51
OMG ! Chris!
I've never watched any of your videos where I held my breath watching as you worked thru such delicate areas! Whew! Just the thought of taking a coping saw to this piece is dreadful! Whenever I've attempted use of a coping saw, I haven't had success in the 'steering' of the blade- it seems to have a mind of its own.Do you have any helpful hints toward effective navigation of a coping saw?
The end product of this project is just breath-taking, realizing what all went into thelittle project.
Thanks so much for this website-a most wonderful source for my inspiration!
Kevin Kelly, Macon, Ga.