Menu
This video is taken from the Merlin project.
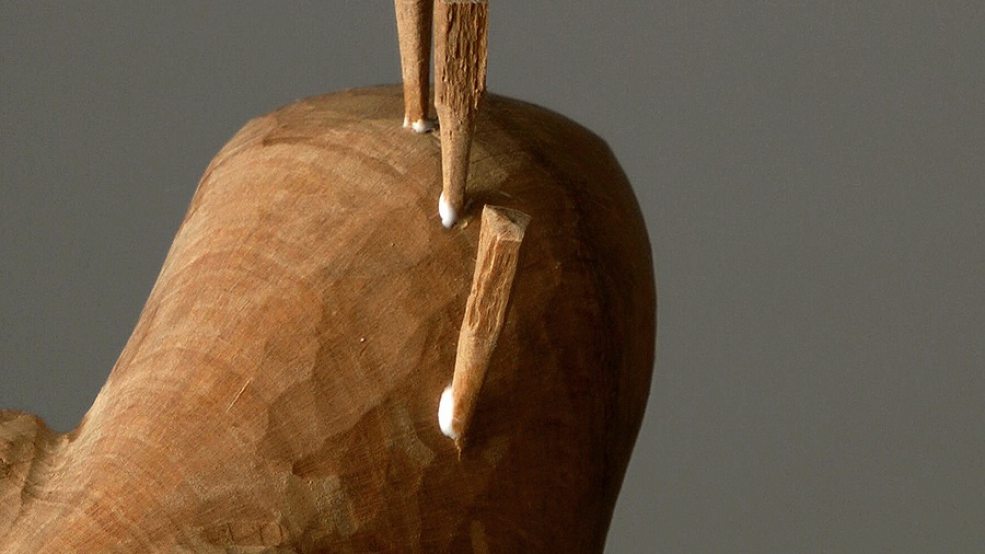
The wood I chose for this carving was exquisite. So exquisite that some unwelcome guests has decided to take up residence and leave a lot of holes. I was able to evict most of the holes by carving them away but was left with a few unsightly one. Here is how I repaired them.

| 11 January 2019 18:21
Michael - Thanks very much for all those thoughts. I know that the 'worms' that do the boring - the larvae of the beetle - being soft creatures need the moisture from the wood, so I can see why they wouldn't like being frozen...

| 11 January 2019 04:14
This will certainly work. Another suggestion for controlling most species of "woodworm" would be to freeze your carving wood at -20 degrees for a week or more to kill larvae, eggs and beetles of many species of these pests. Some people claim as few as 3 days to be effective. I go longer, freezing wood prior to carving. It works post carving too. Dry freezing for a week or so does not negatively impact most woods that I can tell. This is a common method of control when importing wood furniture etc, used extensively rather than fumigation etc. There is an alternative heat technique, but I prefer the cold method instinctively and have a spare freezer used for the purpose. Use of Boric acid solutions, soaking the wood, also is effective, though it is not "non-toxic" as often claimed. Boric acid is neurotoxic to people and pets if exposures are high enough, but it can be used safely if steps are taken to avoid systemic absorption, which more of a problem with solutions vs dry powder. The key I think is proper drying storage after the eradication to avoid reinfestation. Species of borers vary some worldwide and there is some variation in susceptibility to these techniques but I have used cold temperature successfully and boric acid when the wood is too large for my freezer.
Michael Stoskopf

| 26 January 2015 15:36
Chris - I thought of enlarging the hollow to put more real wood in, but in this case, it was just a surface thing, and my experiment didn't work too badly considering that it's for a project that called for a sanded surface anyway. Thanks as always for your input and experience.
| 26 January 2015 13:45
Ann - I've never done that but it sounds reasonable so perhaps an experiment is in order? Generally, I prefer replacing with wood, particularly as you can try for an discrete grain and colour match. (BTW, I think carving gives one just the sort of skills to hollow out the shape to fit the piece you want to add!)
| 24 January 2015 16:16
Filling in worm holes worked wonderfully this way! My question is, I'm working on very seasoned olive wood that tends to almost "crumble" at times. I have a spot that I can't hide or carve away. Have you ever tried (with success!) to make almost a spackling compound out of its own dust and a bit of white glue? Do you think it would work? Any other suggestions? Thanks!
| 04 October 2014 14:57
I do hope B&Q gave you your next jar of oil free!!